
How to Inspect RV Delamination Before Buying a Used Travel Trailer
A used travel trailer can have polished fiberglass, fresh decals, a dry-smelling interior and working appliances while moisture damage is already spreading inside one of its laminated walls.
The first visible warning may be nothing more than a slight wave beside a window, a small bubble under a marker light or a section of wall that looks different only when sunlight crosses it at an angle.
That is why used RV delamination should be treated as a pre-purchase investigation rather than a cosmetic bargaining point.
The exterior skin is only the visible layer. Behind it may be adhesive, thin backing material, foam insulation, wood or aluminium framing and the interior wall panel. Exact construction varies by manufacturer and model.
When one layer separates, the buyer needs to answer three questions:
- Why did the bond fail?
- Are the materials behind the skin still dry and structurally sound?
- How far does the damage extend beyond the visible bubble?
Until those questions are answered, “it has looked like that for years” is not a diagnosis.
Treat the visible bubble as the boundary of the known symptom—not automatically the boundary of the leak, moisture path, substrate damage or repair.
A wall may be dry after warm weather while adhesive, backing or framing remains permanently damaged. Current leak testing and historical damage assessment are separate questions.
What RV Sidewall Delamination Actually Means
RV sidewall delamination is the separation of layers that were intended to work as one bonded wall panel.
A common laminated wall may contain:
- An exterior fiberglass-reinforced plastic or gel-coated skin.
- A thin wood or composite backing sheet.
- Structural framing.
- Foam insulation.
- An interior wall panel.
- Adhesive between several or all of these layers.
Not every manufacturer uses the same materials. Some walls use wood backing, some use composite substrates, and some use different vacuum-bonded or pinch-rolled processes.
The practical issue remains the same: once the bonded layers no longer act together, the wall can lose stiffness and allow more movement, cracking and water entry.
Exterior Delamination
Visible exterior signs can include:
- Bubbles.
- Waves.
- Raised ridges.
- Creases.
- A loose-looking outer skin.
- Areas that change appearance in heat or direct sun.
Interior Delamination
Interior wall covering can also separate because of moisture or adhesive failure. Look for:
- Wrinkled wallpaper.
- Blisters beneath decorative film.
- Swollen trim.
- Soft wall panels.
- Discolouration around fasteners.
Delamination Is Not the Same as Every Surface Imperfection
Manufacturing print-through, minor panel waviness, thermal expansion, previous body repair or impact damage can sometimes resemble delamination.
That is why suspected fiberglass RV delamination should be assessed by location, movement, sound, moisture evidence and interior condition rather than appearance alone.
How a Small Leak Becomes Hidden Wall Damage
Stage 1: A Seal, Joint or Component Begins to Leak
The entry point may be:
- A roof-to-sidewall seam.
- A front or rear cap joint.
- A window frame.
- A marker light.
- An awning bracket.
- A ladder mount.
- A slide-out corner.
- A storage-compartment door.
- A water inlet or exterior shower.
- A refrigerator, furnace or water-heater opening.
Stage 2: Water Travels Inside the Assembly
The visible damage may not sit directly beneath the failed seal.
Water can follow:
- Framing members.
- Wiring openings.
- Fasteners.
- Backing sheets.
- Adhesive gaps.
- The lower edge of the wall.
This is why repairing only the seal directly beside a bubble may not stop the actual leak.
Stage 3: Backing and Adhesive Lose Strength
Some adhesives lose bond when exposed to prolonged moisture, heat cycling or movement. Wood-based backing can swell and no longer provide a flat bonding surface.
Stage 4: Hidden Materials Remain Damp
Enclosed wall materials can dry slowly. Repeated wetting may lead to:
- Swollen wood backing.
- Rot.
- Corroded fasteners.
- Staining.
- Mold or mildew growth.
- Loss of screw retention.
Stage 5: The Exterior Skin Becomes Visible
By the time a clear bubble appears, the bond failure may already extend beyond the area that can be seen from outside.
Visible travel trailer water damage should therefore be treated as the boundary of the known symptom—not automatically the boundary of the repair.
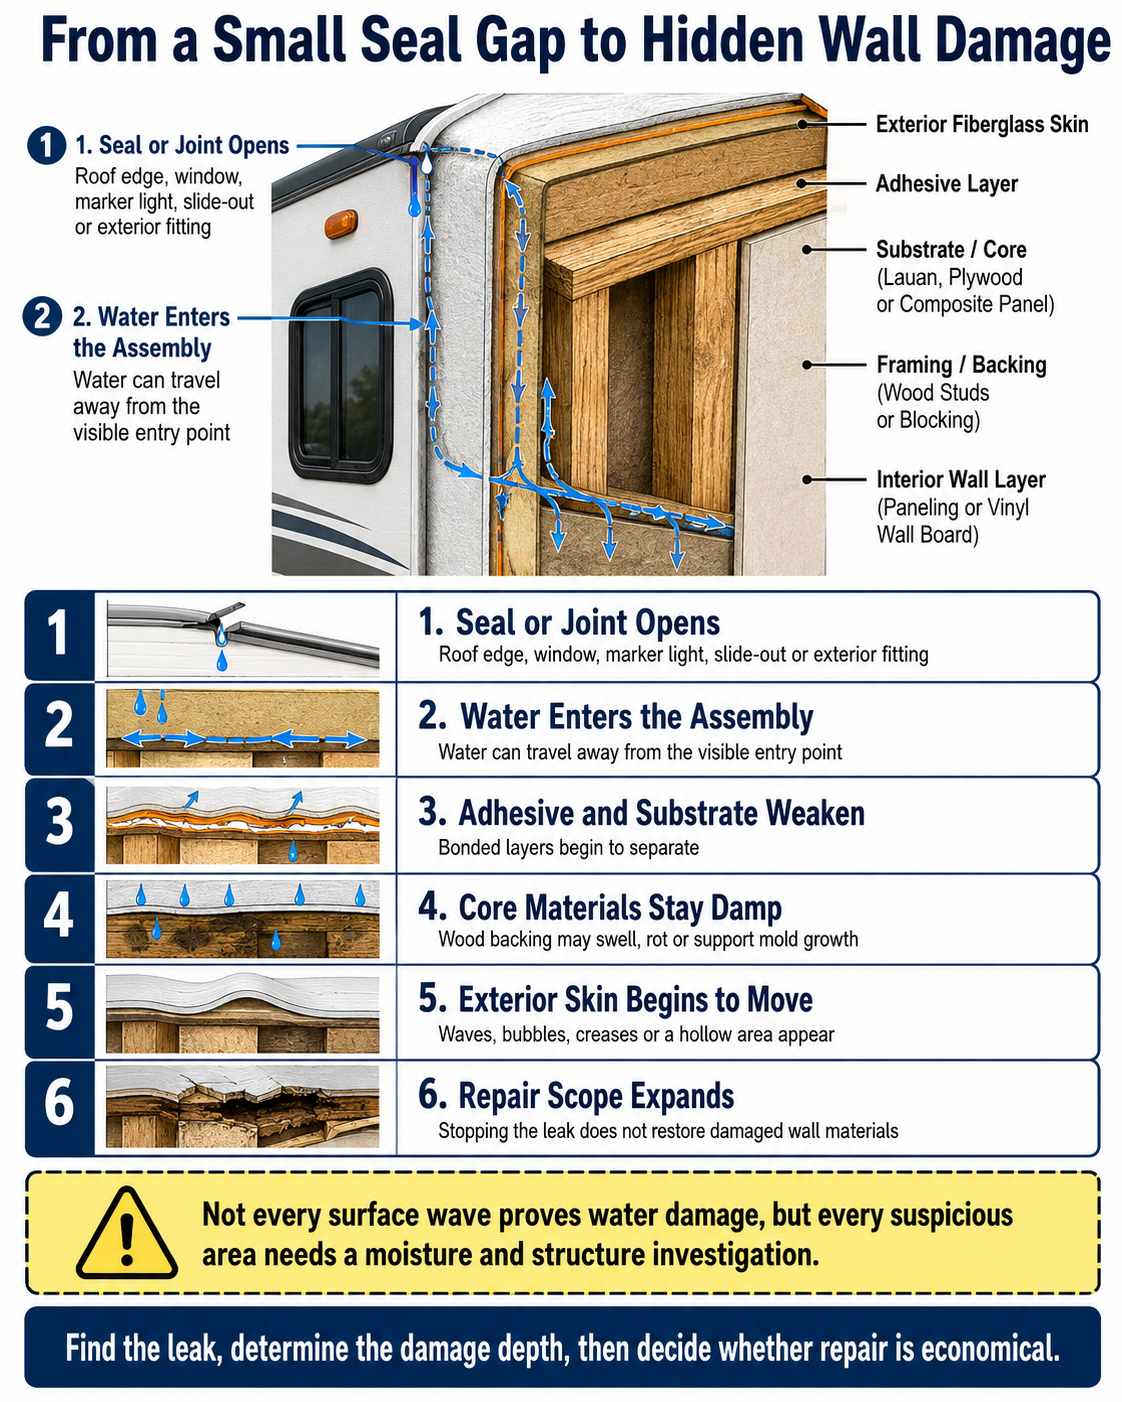
Water Is Common, but Not Every Bubble Has the Same Cause
Water Intrusion
Water is one of the most serious causes because it can damage both the adhesive and the wall materials beneath it.
Impact Damage
A branch, road debris or collision can compress the foam or backing without immediately breaking the flexible outer skin.
The skin may later separate over the damaged area.
Adhesive or Manufacturing Failure
An isolated bond failure can occur without a current leak because of:
- Insufficient adhesive coverage.
- Incorrect production pressure.
- Contamination between layers.
- Material incompatibility.
- Excessive heat exposure.
Thermal and Structural Movement
Repeated expansion, contraction and chassis flex can enlarge an existing weak bond.
Why Buyers Should Still Start with a Leak Investigation
When delamination is close to an opening, roof edge, slide-out or repaired seam, water intrusion should be treated as a leading possibility until the surrounding structure is shown to be dry and sound.
Trace Likely Water Entry Points Above and Around the Defect
Do not begin the inspection at the centre of the bubble and stop there.
Trace upward, forward and rearward to every exterior penetration or joint that could feed water into the wall.
Roof-to-Sidewall Joint
Inspect:
- Termination moldings.
- Sealant edges.
- Fastener covers.
- Front and rear transitions.
- Awning attachments.
Roof Penetrations
Check:
- Air conditioners.
- Roof vents.
- Skylights.
- Antennas.
- Solar mounts.
- Ladder attachments.
Windows and Doors
Look for:
- Separated perimeter sealant.
- Shrunken corner joints.
- Blocked window drainage openings.
- Staining below the frame.
- Fresh sealant applied over dirty or failed material.
Slide-Out Perimeter
Inspect:
- Upper corners.
- Roof membrane.
- Wiper and bulb seals.
- Side-wall joints.
- Lower floor edge.
- Areas hidden beneath slide toppers.
Exterior Components
Marker lights, utility ports, water fills, speakers, handles and appliance flanges all create holes through the exterior envelope.
A proper RV roof seal inspection and exterior-envelope inspection should use the correct access procedure for the specific trailer. Do not walk on a roof unless its manufacturer permits roof access.

Inspect the Exterior Under Conditions That Reveal Surface Movement
Use Low-Angle Light
Inspect the wall in early-morning or late-afternoon sunlight. View along the wall rather than directly at it.
Side lighting makes shadows from waves, ridges and bubbles easier to see.
Compare Both Sides of the Trailer
A buyer who studies only one suspicious panel may misinterpret normal construction patterns.
Compare:
- Wall flatness.
- Framing print-through.
- Window locations.
- Sun exposure.
- Previous repairs.
Inspect at More Than One Temperature When Practical
Some loose skins become more obvious in warm sunlight and appear flatter when cool.
A changing bubble does not identify the cause, but it supports the possibility that the skin is no longer bonded uniformly.
Do Not Press Hard
Use light fingertip pressure only. Aggressive pressing can:
- Crack an already weakened skin.
- Enlarge the separated area.
- Damage a trailer that does not belong to the buyer.
Look for Repair Evidence
Pay attention to:
- Different gloss or colour.
- Overspray.
- Uneven trim.
- Fresh sealant on an older trailer.
- Extra screws.
- Non-original moldings.
- Large decals placed over one area.
A repair is not automatically negative, but it requires documentation and a clear explanation of what was replaced.
Use Moisture, Thermal and Tap Tests as Comparative Evidence
A professional used travel trailer inspection combines several observations instead of relying on one gadget.
Light Tap Comparison
A lightly tapped bonded panel may produce a different sound from a separated area.
However, sound also changes near:
- Framing.
- Windows.
- Foam joints.
- Cabinets.
- Internal reinforcement.
Use the tap test to compare neighbouring zones, not to declare structural failure from one hollow note.
Pinless Moisture Meter
An RV moisture meter inspection can map relative changes across walls, ceilings and floors.
Useful practice includes:
- Establishing dry reference readings.
- Using a grid rather than one point.
- Comparing inside and outside evidence.
- Recording material and temperature conditions.
- Repeating suspicious readings.
Possible false or elevated indications can come from:
- Aluminium framing.
- Fasteners.
- Wiring.
- Metal backing plates.
- Different wall materials.
Thermal Imaging
A thermal camera shows temperature differences, not water directly.
A cooler or warmer pattern may be caused by:
- Moisture evaporation.
- Missing insulation.
- Air leakage.
- Metal framing.
- Sun exposure.
- Heating or cooling equipment.
Thermal imaging is most useful when its pattern aligns with moisture readings, stains or known leak paths.
Borescope Inspection
A borescope may provide useful information through an existing removable fitting or service opening.
Do not drill exploratory holes into a seller's trailer without written permission and a repair plan.

Inspect the Matching Interior Wall, Cabinets and Floor
Locate the exact interior area behind and below the exterior bubble.
Cabinets
Open every cabinet against the exterior wall and inspect:
- Upper roof corners.
- Back panels.
- Shelf edges.
- Fasteners.
- Musty odours.
Windows
Check beneath the window for:
- Wrinkled wall covering.
- Swollen trim.
- Rusty screws.
- Water tracks.
- Soft lower corners.
Floor-to-Wall Junction
Water moving down a wall may collect at the lower edge and damage the floor before obvious wall staining appears.
Potential RV wall soft spots and floor soft spots should be checked near:
- Entry doors.
- Slide-outs.
- Windows.
- Bathrooms.
- Front storage compartments.
- Rear corners.
Mattresses and Upholstery
Lift mattresses and cushions that sit against exterior walls. Check the platform, wall and fabric for staining or odour.
Electrical and Plumbing Openings
Inspect around:
- Outlets.
- Switches.
- Water connections.
- Appliance openings.
Do not remove live electrical equipment during a basic buyer inspection.

Match Visible Damage to the Highest-Risk Leak Locations
| Visible exterior location | Possible entry points | Interior areas to inspect |
|---|---|---|
| Upper wall near roof edge | Roof seam, awning rail, marker light, front or rear cap | Overhead cabinets, ceiling corners and upper wall trim |
| Below a window | Window flange, frame corner, blocked drainage or failed sealant | Lower wall, furniture, electrical outlets and floor edge |
| Slide-out side or lower corner | Upper seal, slide roof, side molding or floor edge | Sofa base, dinette, slide floor and adjacent cabinet |
| Front wall | Front-cap seam, clearance lights, roof transition or lower trim | Bed platform, front wardrobe and pass-through storage |
| Rear wall | Roof seam, ladder, camera, lights or rear moldings | Rear cabinets, bathroom wall and floor corners |
| Around appliance opening | Flange seal, vent cover, utility connection or service door | Cabinet interior, floor, wiring and surrounding wall |
Separate Active Leakage from Historical Wall Damage
A Dry Reading Today Does Not Prove the Wall Was Never Wet
A trailer inspected after weeks of hot, dry weather may show lower moisture readings even though previous water exposure damaged the adhesive and wood.
Fresh Sealant Does Not Prove the Leak Was Repaired Correctly
Ask:
- What was removed before resealing?
- Which sealant was used?
- Was the substrate dried?
- Was a pressure test performed?
- Was the interior wall opened?
- Was damaged material replaced?
A Leak Test Finds Breaches, Not Every Consequence
A professional positive-pressure test can help locate current exterior openings.
It cannot by itself determine:
- How long the leak existed.
- How much water entered.
- Whether wood has lost strength.
- Whether mold exists inside the wall.
- Whether an old leak was repaired before the test.
Rain History Matters
A dry-day inspection may be followed by a second visit after rain when practical.
Check whether:
- The suspicious area changes.
- Interior readings rise.
- Odours become stronger.
- Water appears in tracks or cabinets.
Classify Damage Severity Before Discussing Price
Level 1: Surface Irregularity with No Supporting Damage Evidence
Possible conditions:
- Minor manufacturing waviness.
- Old impact mark.
- Previous professional cosmetic repair.
- No moisture pattern.
- No soft wall or interior signs.
This condition still requires documentation and professional assessment when the cause is uncertain.
Level 2: Localised Bond Separation with Dry, Firm Substrate
A limited professional rebond may be possible when:
- The leak source has been corrected.
- The backing remains dry.
- The core remains firm.
- The affected boundaries are known.
- The outer skin can be positioned and clamped correctly.
Level 3: Wet or Soft Backing
Simple adhesive injection is unlikely to restore material that is swollen, rotten or missing.
Repair may require:
- Removing trim and components.
- Opening the wall.
- Removing damaged backing.
- Drying the assembly.
- Replacing insulation or framing.
- Rebuilding the laminated panel.
- Refinishing the exterior.
Level 4: Widespread Structural Damage
Serious RV mold and wood rot may be accompanied by:
- Large wall movement.
- Soft roof decking.
- Soft flooring.
- Loose windows or fixtures.
- Frame corrosion.
- Multiple leak paths.
- Long-standing odour.
At this level, the purchase may only make sense as a documented reconstruction project rather than a ready-to-use trailer.
| Severity level | Evidence pattern | Likely repair exposure | Purchase interpretation |
|---|---|---|---|
| Level 1: surface irregularity | No matching moisture pattern, softness or aligned interior evidence | Documentation, professional confirmation or cosmetic correction | Potentially acceptable, but the cause should still be bounded |
| Level 2: local dry bond separation | Limited movement with dry, firm backing and a corrected leak source | Controlled local rebond may be possible after professional confirmation | Negotiate only with a written scope and hidden-damage allowance |
| Level 3: wet or soft substrate | Moisture, swollen backing, soft wall, rusty fasteners or loss of screw retention | Wall opening, drying, material replacement and exterior refinishing | Major project risk; visible size is not a reliable cost guide |
| Level 4: widespread structural damage | Multiple walls, soft roof or floor, loose openings, odour or several leak paths | Extensive reconstruction with uncertain boundaries and schedule | Usually walk away unless intentionally buying a rebuild project |
Why Adhesive Injection Is Not Always a Structural Repair
Delamination repair kits are frequently presented as a simple solution: drill or access the separated area, inject adhesive and clamp the panel flat.
That approach can only bond surfaces that are capable of being bonded.
Adhesive Cannot Restore Rotten Wood
If the backing has turned soft or fragmented, the adhesive may attach only to damaged fibres.
Adhesive Does Not Remove Trapped Water
Sealing wet material inside a wall can prolong the moisture problem.
The Leak Must Be Stopped First
Rebonding while the entry path remains open allows the damage to return.
Clamping Access Matters
A large exterior panel requires controlled, even pressure while the adhesive cures. Improvised jacks, boards and pressure points can deform the wall or damage the RV.
Structural Components May Require Replacement
Rebonding the skin does not repair:
- Rotten framing.
- Corroded fasteners.
- Wet insulation.
- Damaged window mounting surfaces.
- Soft floor edges.
Obtain a Written Repair Scope Before Negotiating
A useful estimate should explain more than “repair sidewall.”
Ask the repair facility to identify:
- The suspected water-entry point.
- The known damaged area.
- How damage boundaries will be confirmed.
- Whether components must be removed.
- Which wall layers will be replaced.
- Whether framing repair is included.
- Whether refinishing and decals are included.
- Whether hidden damage can change the price.
- What warranty applies to the repair.
The true delamination repair cost depends on damage depth, panel size, wall construction, labour access, component removal and exterior refinishing.
Do not reduce the asking price by a guessed amount from an online forum and assume the financial risk is covered.

Questions and Records to Request from the Seller
When Was the Area First Noticed?
A recent observation does not prove the damage is recent. Ask for photographs from previous years.
Has the Trailer Ever Leaked?
Ask specifically about:
- Roof leaks.
- Window leaks.
- Slide-out leaks.
- Plumbing leaks.
- Storage-compartment leaks.
- Condensation or mold.
What Was Repaired?
Request:
- Invoices.
- Technician reports.
- Before-and-after photographs.
- Material and sealant information.
- Leak-test results.
- Repair warranty.
How Was the RV Stored?
Covered storage reduces some exposure but does not eliminate past leaks or plumbing damage.
How Often Were the Roof and Seals Inspected?
A maintenance log is more valuable than a verbal statement that seals were checked “regularly.”
Will the Seller Permit an Independent Inspection?
Refusal to allow a reasonable inspection, moisture survey or professional leak test is a major purchasing warning.
Evidence That Should Increase Purchase Risk
- A bubble directly below a roof or window seam.
- Several separated areas on the same wall.
- Softness behind the exterior skin.
- Interior staining aligned with the exterior defect.
- A musty smell inside cabinets.
- Soft flooring near the wall.
- Fresh sealant with no repair records.
- Rusty screws or swollen trim.
- Water marks inside storage compartments.
- A seller describing all delamination as harmless heat expansion.
When Walking Away Is the Rational Decision
A buyer should seriously consider rejecting the trailer when:
- Delamination is widespread across several walls.
- The roof or floor contains soft areas.
- Multiple openings show leak evidence.
- The wall structure moves around a window or door.
- The interior has persistent mold or musty odour.
- The seller cannot explain recent repairs.
- A professional cannot define the repair boundary.
- The written repair exposure approaches the economic value of the trailer.
- The trailer is required for immediate travel and repair timing is uncertain.
A low purchase price does not reduce the technical scope of the repair.
When the Purchase May Still Be Defensible
A trailer with a known wall issue may still suit an informed buyer when:
- The damage is localised.
- The cause is documented.
- The current leak is corrected.
- The core and framing are confirmed sound.
- A qualified repair facility provides a written scope.
- The purchase price reflects the full repair risk.
- The buyer has time and budget for the project.
The key distinction is not “delamination or no delamination.” It is “known, bounded and repairable damage” versus “unknown damage hidden behind a clean exterior.”
Used Travel Trailer Delamination Inspection Checklist
Exterior Walk-Around
- Inspect in low-angle sunlight.
- View every wall from front and rear angles.
- Look for waves, bubbles, ridges and creases.
- Compare suspicious areas with the opposite wall.
- Check for colour or gloss changes.
- Inspect decals that may conceal a repair.
- Use only light fingertip pressure.
- Compare sound gently across neighbouring sections.
Seal and Roof Survey
- Inspect roof-to-wall joints.
- Inspect front and rear cap seams.
- Inspect roof penetrations.
- Inspect windows and doors.
- Inspect marker lights.
- Inspect slide-out seals and upper corners.
- Inspect appliance and utility openings.
- Identify fresh or incompatible sealant repairs.
Interior Survey
- Open every cabinet against an exterior wall.
- Inspect ceiling and upper corners.
- Look below windows.
- Lift mattresses and cushions.
- Inspect wall-to-floor joints.
- Check pass-through storage.
- Look for swollen trim and rusty screws.
- Note musty odours.
- Check floors for softness.
Diagnostic Evidence
- Map comparative moisture readings.
- Record dry reference areas.
- Interpret thermal images with surface conditions.
- Document suspicious hollow areas.
- Arrange a professional pressure test where appropriate.
- Request non-destructive or authorised internal inspection.
Documents
- Maintenance records.
- Roof and seal inspection history.
- Repair invoices.
- Leak-test reports.
- Insurance claims.
- Warranty repairs.
- Storage history.
- Previous inspection reports.
Purchase Decision
- Damage source identified.
- Damage boundaries estimated.
- Active leak status known.
- Substrate condition assessed.
- Written repair scope obtained.
- Hidden-damage contingency included.
- Purchase price compared with repaired market value.
Used-RV Dealer and Exporter Disclosure Checklist
For dealers, wholesalers and exporters, hiding a wall bubble creates more commercial risk than documenting it.
Condition Mapping
Record:
- Exterior defect locations.
- Moisture-survey locations.
- Interior stains or soft areas.
- Seal condition.
- Repair history.
Standardised Photography
Photograph each wall:
- Straight on.
- From the front angle.
- From the rear angle.
- In low-angle light.
- Before and after repairs.
Clear Repair Categories
Use distinct descriptions such as:
- Seal maintenance only.
- Known local bond separation.
- Water-damaged substrate.
- Structural wall reconstruction.
- Condition unknown pending disassembly.
Do Not Describe Unknown Damage as Cosmetic
“Cosmetic” should be used only when the underlying materials have been evaluated and no structural or moisture damage is present.
Independent Inspection Access
Allow buyers or importers reasonable access for an independent inspection before final acceptance.
What RV Manufacturers and B2B Buyers Should Specify
Wall Construction
- Exterior skin material.
- Backing material.
- Core type.
- Frame material.
- Adhesive specification.
- Bonding method.
Water-Intrusion Protection
- Roof-to-sidewall joint design.
- Window and component flange sealing.
- Fastener sealing.
- Drainage and weep paths.
- Slide-out perimeter details.
- Sealant compatibility.
Factory Quality Control
- Bond coverage checks.
- Panel flatness criteria.
- Adhesive cure controls.
- Leak testing.
- Thermal-cycle validation.
- Repair traceability.
After-Sales Documentation
- Seal inspection intervals.
- Approved sealants.
- Roof-access limitations.
- Leak warning signs.
- Wall repair procedures.
- Warranty exclusions and responsibilities.
GOODIN Industry Perspective
Delamination is a body-and-envelope defect rather than a trailer-jack failure. During inspection or structural repair, park on firm ground, secure the trailer against movement and support it only at manufacturer-approved locations.
A tongue or A-frame jack supports and positions the front during coupling and parking. It is not an axle-service jack and should not be the only support while structural wall materials are removed.
The GOODIN trailer-jack range covers front-support configurations for RV, marine, utility and commercial trailers. A jack rating does not diagnose wall strength or make an unapproved repair safe.
When replacing front-support equipment, use actual vertical load and mounting geometry from the trailer-jack selection guide. Do not twist the body with jacks or stabilizers to hide a wall bubble.
Use Front-Support Equipment Only for Its Approved Load and Location
These categories support coupling, parking and positioning. They are not wall-repair tools, axle-service stands or proof that a delaminated panel is structurally sound.
Specify Trailer Support Separately from the Wall Repair
For a trailer-jack enquiry, provide trailer type, actual vertical support load, A-frame dimensions, mounting location, travel, retracted height, handle or motor clearance, corrosion environment, quantity and target market. For delamination, obtain a repair scope from a qualified RV body or structural repair facility.
Focused FAQ
What Does RV Delamination Look Like?
Common signs include exterior waves, bubbles, creases, raised ridges or a loose-looking fiberglass skin. The defect may become easier to see in low-angle sunlight.
Does Every Bubble Mean Water Damage?
No. Impact, adhesive failure, manufacturing irregularities or thermal movement can also create surface changes. However, a bubble near a roof seam, window or exterior opening should be investigated for water intrusion.
Can a Used RV Look Dry but Still Have Delamination?
Yes. The wall may have dried after an old leak, while the adhesive and substrate remain damaged. A dry reading on one day does not prove that no historical damage exists.
Is Delamination Only a Cosmetic Problem?
Not necessarily. It may involve only a local bond, but it can also indicate wet backing, rot, mold, loose fixtures or reduced wall stiffness.
Where Should I Look First?
Inspect roof edges, front and rear cap seams, windows, marker lights, slide-out corners, exterior storage doors and appliance openings above or near the visible defect.
Why Is the Leak Sometimes Far from the Bubble?
Water can follow framing, wiring, backing sheets and wall edges before collecting in another area.
Can I Detect Delamination by Tapping the Wall?
A separated area may sound different, but framing and internal reinforcement also change the sound. Use tapping only as a comparison tool.
Will a Moisture Meter Confirm Hidden Rot?
No. It can identify suspicious relative moisture patterns, but metal framing, fasteners and different materials can affect readings. Rot requires additional evidence or inspection.
Can Thermal Imaging Find Water Inside an RV Wall?
It can reveal temperature patterns that may be associated with moisture, missing insulation or air leakage. It does not display water directly.
Does a Pressure Leak Test Prove the Wall Is Good?
No. It can locate current exterior breaches but does not determine whether earlier leaks caused hidden substrate or structural damage.
Can Delamination Be Repaired by Injecting Glue?
Only in limited cases where the separated surfaces remain dry, firm and capable of bonding. Adhesive cannot restore rotten or missing backing material.
Should the Leak Be Repaired Before the Delamination?
Yes. The water-entry path must be identified and corrected before the wall is rebonded or rebuilt.
Can Mold Be Hidden Inside a Delaminated Wall?
Damp organic materials can support mold or mildew growth. The absence of visible interior mold does not prove the enclosed wall is unaffected.
Is Fresh Sealant a Good Sign?
It may indicate responsible maintenance or a recent attempt to cover a leak. Ask what was removed, which product was used and whether the underlying damage was inspected.
Should I Buy a Trailer with a Small Delamination Bubble?
Only after the cause, moisture condition, damage boundaries and repair scope are documented. The visible size alone does not define the risk.
When Should I Walk Away?
Widespread wall separation, soft roofs or floors, multiple leak paths, strong musty odours and undefined repair boundaries are strong reasons to reject the purchase.
Can Delamination Affect Resale Value?
Yes. Unresolved or undocumented delamination creates uncertainty about hidden damage and future repair exposure.
How Often Should RV Seals Be Inspected?
Follow the trailer manufacturer's schedule. Roof and exterior seals commonly require several inspections each year and additional checks after severe weather or impact.
Can I Inspect the Roof by Walking on It?
Only when the manufacturer confirms that the roof is designed for access and specifies where to step. Otherwise inspect from a safe platform or use a professional.
Why Is an Independent Inspection Worth Paying For?
The inspector works for the buyer and can document moisture, seals, structure and systems before the purchase becomes final.
Conclusion
The most dangerous used-trailer delamination is not always the largest bubble.
A small wave below a window or roof joint may be the visible end of a much longer moisture path. Water can damage adhesive, backing, framing, flooring and interior finishes before the exterior skin moves enough to attract attention.
Not every wall irregularity proves water damage, but no suspicious bubble should be dismissed from appearance alone.
A defensible buying process follows a fixed order:
- Inspect the complete exterior in low-angle light.
- Trace every possible entry point above and around the defect.
- Inspect the corresponding interior wall, cabinets and floor.
- Use moisture, thermal and sound tools as comparative evidence.
- Determine whether a current leak still exists.
- Obtain a written professional repair scope.
- Compare the full repair risk with the trailer's repaired value.
The seller's statement that the defect is cosmetic is not enough. The buyer needs evidence that the wall is dry, structurally sound and economically repairable.
When that evidence cannot be obtained, the safest business decision is often to leave the trailer for someone who is intentionally buying a reconstruction project.
Technical References
- Keystone RV: Exterior Seal Maintenance Guide
- Winnebago: Window, Roof-Seal and Delamination Prevention Guidance
- Winnebago: 2026 Towables Operator Manuals
- Grand Design RV: Current Owner Manuals and Warranty Resources
- Forest River: Interactive Owner Manuals
- NRVIA: Standards of Practice for RV Inspections
- NRVIA: 2026 Buyer Guidance for Independent RV Inspections
- SealTech: Positive-Pressure RV Leak-Test Operating Method
Can an EV Tow a Travel Trailer? Range, Charging and Payload Guide
Can You Put a Bike Rack on the Back of a Travel Trailer?
Related Article


