Manual Trailer Jack In-Depth Maintenance Guide: Keep Every Turn Smooth and Effortless
The following guide is organized into four key areas: cleaning, lubrication, rust prevention and functional inspection, and storage. Every detail is aimed at preserving smooth operation and long-term reliability.

1. Cleaning: Removing Grime While Conducting a Non-Disassembly Inspection
Cleaning a manual trailer jack is not just a matter of hosing it down. The real enemy—grit-laden old grease—hides deep within the threads of the lead screw, the teeth of the gears, and the clearances of the bearings. A thorough cleaning also provides the perfect opportunity to spot early signs of wear or damage.
Begin cleaning after every trip, especially if the trailer has been towed through mud, sand, or winter road salt. Use a low-pressure water stream to rinse loose dirt from the outer tube, the caster wheel assembly, and the crank handle socket. For dried-on, crusted mud, do not scrape it off with a screwdriver or a metal blade—scratches in the zinc plating or paint will quickly become rust sites. Instead, lay a wet rag over the mud for a few minutes to soften it, then gently brush it away with an old toothbrush, following the direction of the screw threads.
Deep Cleaning the Lead Screw Threads
This step requires the most patience. Crank the jack down to its lowest position so the lead screw is fully retracted into the outer tube. Using an old toothbrush dipped in kerosene or a dedicated degreaser, scrub deep into the thread grooves. You'll likely remove blackened, hardened grease packed with fine metal dust and sand. After scrubbing, wipe the threads dry with a clean cloth. Then, using a flashlight, inspect each thread closely. If you notice a section of the thread crest appearing shiny or worn white, that area has experienced dry metal-on-metal friction and will need extra attention during lubrication. If you find any burrs, rolled edges, or deformation on the threads, consider it a serious warning sign—the screw may be nearing the end of its service life and should not be subjected to heavy loads.
Cleaning Gears and Bearings
For jacks equipped with a side-mounted gearbox, remove the side cover if possible. Spray the internal gears with brake cleaner or a solvent-based degreaser to flush out old grease and metal shavings. Allow the solvent to evaporate completely and ensure the interior is dry before applying fresh lubricant. If disassembly is not feasible, spray the cleaner through any available gaps while rapidly turning the crank handle; the motion of the gears will help expel debris. Blow out the residue with compressed air directed from bottom to top.

2. Lubrication: Choosing the Right Product for Each Component
Lubrication is the heart of manual jack maintenance. The most common mistake is using a single tub of general-purpose grease for everything. Different moving parts require lubricants with different properties.
Lead Screw and Nut Assembly: Molybdenum Disulfide Lithium Grease
The interface between the lead screw and its traveling nut bears the full tongue weight of the trailer—often several hundred kilograms—under slow, extreme pressure. Standard calcium-based grease will be squeezed out of the contact area under this load, leaving metal to grind against metal. The correct choice is an extreme pressure (EP) grease, specifically molybdenum disulfide lithium grease (often dark gray or black in color). Apply it sparingly: use a small brush to coat only the thread grooves with a thin, even film. Then, slowly crank the handle to run the screw into the nut and back out a few times. This distributes the grease evenly onto the internal (female) threads of the nut. Over-application is counterproductive—excess grease will ooze out and collect dirt, accelerating wear on the inner and outer tubes.
Gearbox and Bearing Points: Light Grease or Gear Oil
The gears inside the gearbox operate at relatively higher speeds. They benefit from a lubricant with better flow characteristics, such as No. 0 or No. 1 calcium-based grease or a high-viscosity gear oil. For the universal joint on the crank handle and the pivot pins, a few drops of ordinary engine oil applied every few months are sufficient to keep them moving freely without binding.
Caster Wheel Assembly: Focus on the Bearings
The small wheel at the base of the jack is often overlooked but crucial for fine-positioning the trailer. Remove the axle bolt, clean off the old, dried grease, and repack the wheel bearings with fresh grease before reassembling. If the wheel still turns stiffly, resist the urge to spray it with WD-40—this will wash out the grease and lead to rapid wear. Only after the bearings are properly lubricated should you address any rust or binding in the wheel yoke pivot.

3. Rust Prevention and Functional Testing: Nipping Problems in the Bud
The final stage of maintenance is a careful inspection to ensure your efforts have paid off and that the jack is safe to use.
The outer tube of a manual jack is typically carbon steel with a zinc plating or paint finish. Once the coating is chipped, rust will spread underneath it. After each use, check the tube, the base plate, and the mounting brackets for stone chips or scratches. Touch up any bare metal immediately with touch-up paint or cold galvanizing spray. For trailers stored outdoors or in coastal environments, apply a coat of clear cavity wax or hard-film rust preventive to all exposed metal surfaces. This creates a semi-dry film that repels moisture and salt but can be wiped off easily when needed.
Functional Testing
Make it a habit to test the jack before hitching up and after parking. With the trailer unhitched, crank the jack all the way down to its lowest point, then crank it all the way up to its highest point. Pay close attention to the resistance felt through the handle. A healthy jack will offer smooth, consistent resistance, with perhaps a slight increase in effort near the very top as the screw reaches full extension. If you feel a distinct tight spot in the middle of the travel, or a notchy, "clunking" sensation, it likely indicates a deformed thread section or a buildup of rust scale inside the outer tube. Stop immediately and investigate the cause; forcing the handle past the bind can shear the threads inside the nut.
Checking Alignment and Wear
Park the trailer on level ground and observe the caster wheel. It should sit perpendicular to the ground. If the rubber tire is worn heavily on one side, the jack is mounted at an angle. This off-axis loading subjects the lead screw to bending stress, which can eventually cause the screw to snap at its base. Adjust the mounting angle by adding or removing shim plates between the jack bracket and the trailer frame. Also, check for excessive play in the crank mechanism. If the handle wobbles more than about ten degrees before the gears engage, the gears or universal joint are worn and should be replaced.

4. Storage Position: Retract, Cover, and Exercise
How you store the jack has a direct impact on its lifespan. When the trailer is not in use, always crank the jack down to its fully retracted (lowest) position. This serves three purposes: it minimizes the exposed surface area of the lead screw to reduce rust risk; it keeps the majority of the screw threads safely nestled inside the grease-packed nut, acting as a protective oil seal; and it lowers the trailer's overall profile to prevent accidental bumps and scrapes.
A simple canvas or waterproof Oxford fabric cover is the cheapest and most effective investment you can make in the jack's longevity. It shields the mechanism from direct rain and UV sunlight, which can fade and crack paint. Ensure the bottom of the cover is open to allow ventilation and prevent condensation from being trapped inside.
If the trailer will be parked and unused for more than a month, take a moment every two weeks to crank the jack handle three to five turns. This moves the lead screw up and down a short distance, redistributing the grease inside the nut. This simple "exercise" prevents the grease from drying and hardening in a single position, which can make the first use after storage feel as if the jack is welded solid.
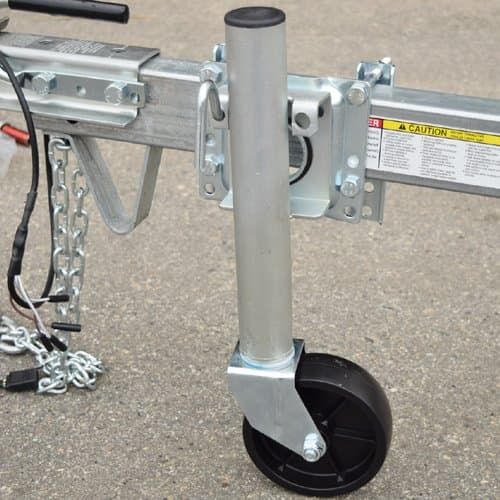
In the end, maintaining a manual trailer jack is an investment in reliability. It costs very little time or money—a can of the right grease, an old toothbrush, and a fabric cover are all it takes. Yet the advice here is forged from the collective frustration of countless trailer owners who have found themselves on their knees in the mud, wrestling with a seized, rusted jack. Treat that unassuming steel pillar with a bit of regular care, and it will reward you with a smooth, silent, and effortless crank every single time—making each unhitch a moment of calm, rather than a test of strength.
(The above images are from Pinterest. If there is any copyright infringement, they will be removed immediately.——Goodin)
Trailer Tongue Jack Installation Tips: Don't Let a Small Washer Become a Safety Hazard
Related Article