Trailer Tool Box Lid Won’t Close Properly: Mounting Distortion, Hinges or Gas Struts?
In this guide
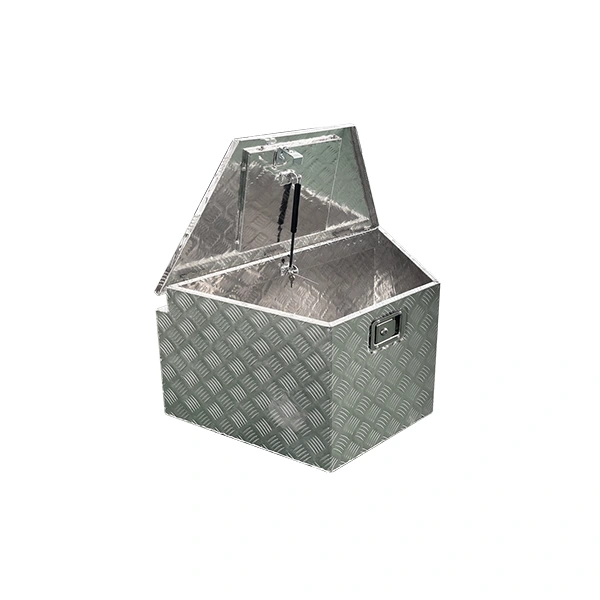
A new aluminum trailer toolbox works perfectly in the workshop. Its lid opens smoothly, the lock engages, and the gas strut holds the lid in position.
Then the toolbox is mounted on the trailer.
One corner no longer sits flush. The latch needs extra pressure to engage. The lid may rub against the body, become difficult to close, or gradually lose its ability to stay open.
What changed?
The toolbox itself may not have a defective lid or gas strut. Installing it on an uneven support can change the alignment of the enclosure. Loose hinges can produce similar symptoms, while an incorrectly positioned gas strut may interfere with the opening movement even when the lid remains structurally sound.
The important distinction is whether the problem comes from the box geometry, the hinge and latch alignment, or the mechanism that supports the lid.
Replacing the gas strut before making that distinction can leave the original problem unresolved—and sometimes introduce additional stress into the opening mechanism.
Installation & Maintenance · Article 04 · Diagnose the complete opening and closing system.
Symptoms: alignment, closing and support
In July 2026, Australian gas strut specialist GAS STRUTS published a technical guide titled How to Fix Sagging Toolbox Lid Problems Fast [1].
The guide identifies several possible causes of lid sagging: worn hinges, loose mounting points, distorted lid structures and deteriorated gas struts.
Its central recommendation is to identify which component is failing before installing stronger replacement struts.
That distinction is especially relevant to trailer toolboxes.
A gas strut primarily provides a controlled supporting force during lid movement. It does not establish the correct shape of the enclosure, compensate for badly worn hinges or guarantee that the latch will align with its striker.
Consider three common symptoms.
The lid is crooked even when fully closed.
The problem may involve a bent lid, displaced hinge, distorted toolbox body or uneven mounting support.
The lid closes squarely but will not remain open.
Insufficient gas strut support, damaged end fittings or incorrect support geometry becomes more likely.
The lid sits evenly but requires excessive pressure to latch.
The latch engagement, closing resistance, internal obstruction or gas strut travel may be responsible.
These problems can occur together, but they should not be treated as the same failure.
Start with the Symptoms: Does the Lid Close, Align and Stay Open?
Before making adjustments, observe exactly how the toolbox behaves.
A useful inspection separates four functions.
Lid Alignment
Does the lid sit evenly on the box opening?
Compare the left and right corners, front edge and hinge side.
A visibly raised corner or diagonal gap suggests a geometry or hinge problem rather than simply weak lid support.
Closing Movement
Does the lid travel smoothly toward the closed position?
Binding, scraping, twisting or an abrupt hard stop may indicate interference, misalignment or an unsuitable gas strut installation.
Latch Engagement
Does the locking mechanism engage without forcing the lid sideways or downward?
A lid that reaches its intended closed position but fails to engage the striker may have a latch alignment problem.
However, a latch that cannot reach the striker because the lid is visibly crooked points toward a broader alignment issue.
Open-Lid Support
Can the lid remain at its intended open position?
A lid that closes correctly but drops unexpectedly after being opened suggests insufficient support.
Gas struts, their mounting brackets and the original lid weight should be examined.
If the support mechanism is suspect, secure the lid with an independent, stable support before inspection. Do not rely on the failing strut or another person holding the lid. Keep hands clear of pinch points; if safe support and access cannot be established, stop and obtain qualified service.
The most useful initial evidence is the combination of these observations—not any single symptom.
Mounting distortion and perimeter gaps
Yes. A toolbox can be correctly assembled and still become distorted when attached to an unsuitable mounting surface.
This is particularly relevant to lightweight aluminum boxes with relatively large panels and a wide lid opening.
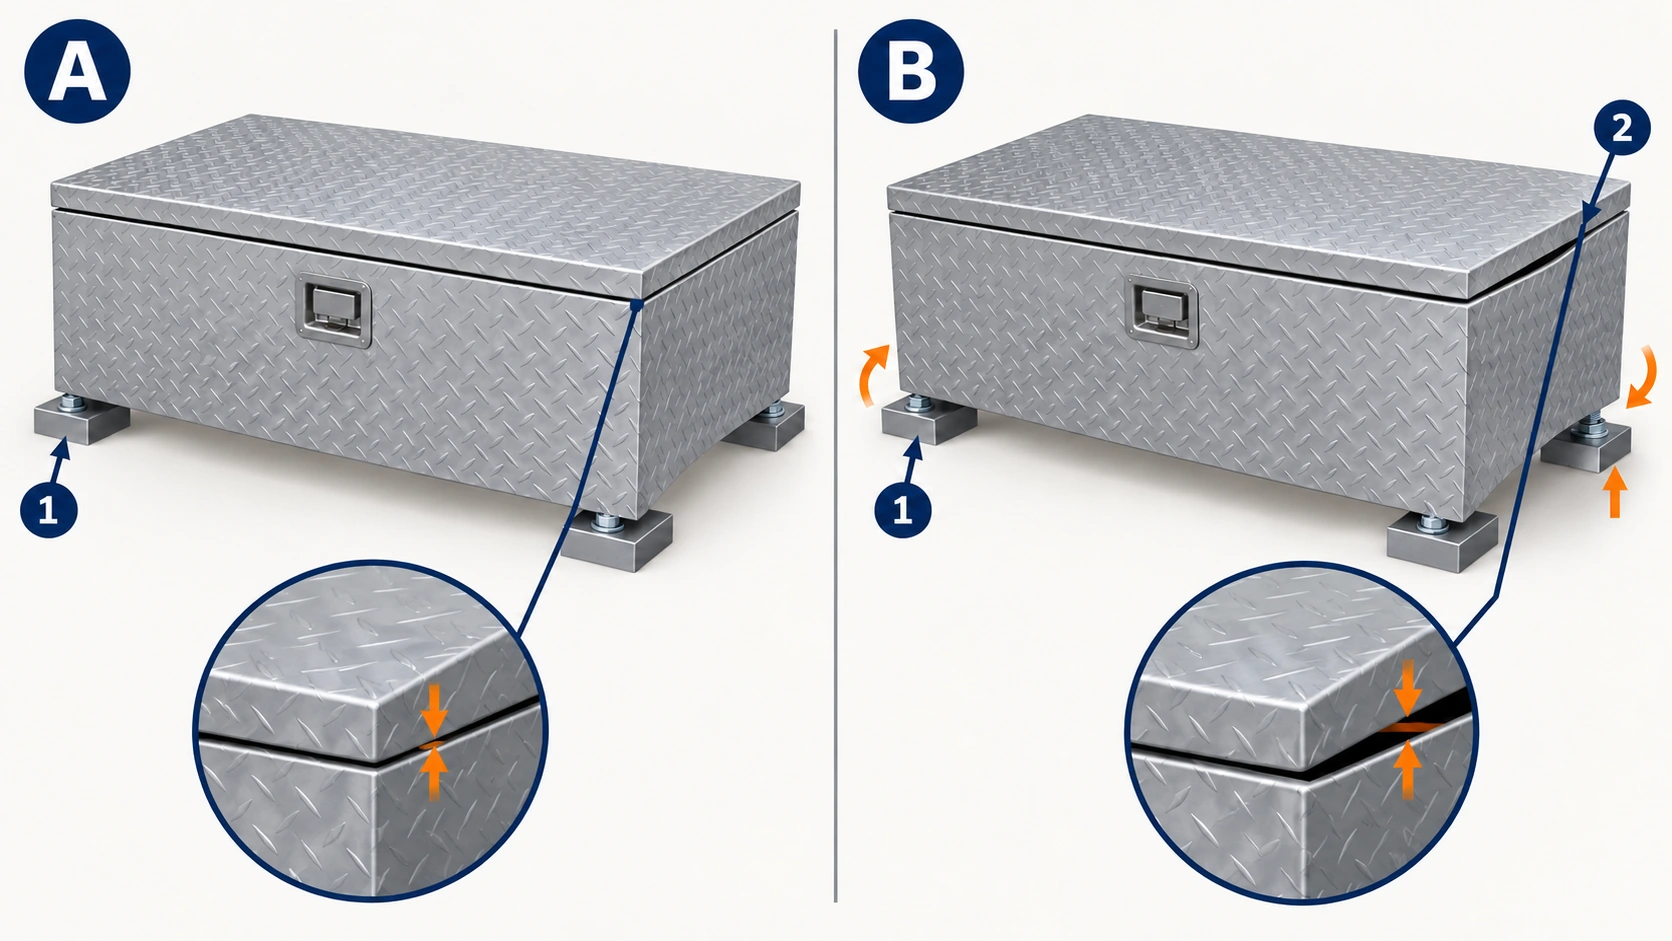
Uneven Support Creates Twisting Forces
Imagine a trailer tongue with two supporting brackets and several attachment locations.
If the required contact points are not coplanar, tightening the box against them can impose twist. A complete box merely tilting as a rigid body is not the same as enclosure distortion.
Before mounting, the toolbox rests in its original shape. When the attachment hardware draws the bottom panel firmly against both brackets, force is introduced into the enclosure.
Depending on the construction and support arrangement, the body can twist slightly.
The lid and hinge line may no longer occupy the same relative positions as before installation.
This can create a raised corner, uneven perimeter gap or latch misalignment.
The change does not need to be visually dramatic.
A small dimensional shift can be enough to prevent a latch tongue from entering its intended striker opening.
Excessive Local Clamping Can Deform the Body
Mounting hardware transfers force into the toolbox through specific contact points.
When those points lack adequate support or load distribution, excessive tightening can create local panel deformation.
Possible results include:
- Depressed areas around mounting hardware
- A base panel pulled out of its original plane
- Distortion near a corner or body flange
- Changed alignment between the lid and latch
- Increased stress at hinges and support brackets
Tightening the same fasteners further may worsen the condition.
How to Recognize Mounting-Related Distortion
Look for evidence that connects the timing and location of the problem to the mounting system.
The strongest clues are:
- The lid worked normally before installation.
- The problem appeared immediately after the mounting hardware was tightened.
- The lid-to-body gap differs diagonally across the opening.
- A corner of the box or mounting base appears locally deformed.
- The closing problem changes after the mounting arrangement is professionally corrected.
A straightedge across accessible body flanges and lid edges can help reveal visible bowing or unevenness.
Measurements at several points are more informative than looking at one corner alone.
What Should Be Corrected?
If the toolbox structure remains sound but the mounting supports are uneven, the correction should address the support arrangement and the specified attachment method.
Suitable support brackets, contact surfaces and load distribution are more effective than forcing the latch to accommodate a twisted enclosure.
Mounting adjustments must also preserve the box's secure attachment to the trailer. Do not loosen structural attachments and continue towing with the box inadequately supported.
If deformation remains after the mounting conditions are corrected, the lid or body itself may require further repair or replacement.
Check Whether the Lid and Body Gaps Are Uniform
The gap between the lid and the toolbox body provides a practical indication of alignment.
It should be evaluated relative to the intended design, not an assumed universal clearance measurement.
Different toolboxes use different lid profiles, hinge arrangements and gasket configurations.
A Raised Front Corner
If one front corner sits noticeably higher than the other, possible causes include body twisting, localized lid deformation or uneven hinge positioning.
Observe the hinge side as well.
If the hinge line remains straight but the front corners differ, the lid or body geometry deserves attention.
If one hinge position has visibly shifted, the hinge attachment may be responsible.
The Entire Front Edge Sits High
A consistently raised front edge can indicate that the lid is not reaching its intended closed position.
Check for trapped contents, displaced edge trim, an obstruction near the latch, or a gas strut that cannot compress through the required travel.
A uniform gap is therefore not always proof that the lid structure is damaged.
The Lid Rubs Along One Side
Contact between the lid edge and body can indicate hinge misalignment, lateral displacement or distortion.
Repeated scraping may eventually damage the finish, mating surfaces or closure hardware.
Forcing the lid past the interference can increase hinge and mounting loads.
The Lid Is Square but Still Hard to Close
If the lid reaches the opening without visible twisting, investigate the latch and gas strut before assuming structural damage.
The location where closing resistance begins can provide an additional clue.
Resistance concentrated at the final latch engagement is different from resistance that develops progressively throughout the lid movement.
Latch alignment and hinge inspection
A toolbox latch depends on the relative positions of its moving catch and fixed striker.
Both components must remain aligned when the lid reaches its intended closed position.
Small changes in either component can make closure difficult.
Misaligned Striker
Some toolbox latches use an adjustable striker, catch plate or engagement rod.
If the striker is displaced, the latch tongue may contact its edge rather than enter the locking position.
Typical symptoms include:
- The lid appears seated but will not lock.
- The latch works only when the lid is pushed sideways.
- A scraping or metallic contact sound occurs near the striker.
- The locking handle operates differently with the lid open and closed.
Where the latch design permits it, adjustment can restore the specified engagement position.
However, adjusting the striker should not conceal an underlying lid or body distortion.
Worn or Damaged Latch Components
A latch may also fail because of damaged internal parts, corrosion, broken springs or excessive movement in its mounting.
If the latch mechanism itself no longer operates correctly, moving the striker is unlikely to provide a reliable solution.
Gasket Resistance Versus Mechanical Interference
A compressible gasket normally offers some resistance as the lid closes.
That resistance should be consistent with the intended latch design.
If a recently replaced gasket is thicker than the original, or is incorrectly positioned, the latch may no longer reach its designed engagement point.
This does not mean the gasket should be cut down or compressed using excessive force.
Verify that the installed gasket and latch arrangement are compatible.
If the lid contacts a hard mechanical obstruction before the gasket reaches its intended position, the obstruction—not the gasket—is the primary issue.
Verify That Locking Is Real
A key turning or latch handle returning to its original position does not necessarily prove that the catch is fully engaged.
Check the actual engagement according to the latch design.
A box that appears closed but can reopen because the striker has not engaged properly must be corrected before road use.
How Worn Hinges Create Lid Sagging and Misalignment
Hinges control the lid's path of movement.
When the hinge geometry changes, the lid may no longer follow its original opening and closing path.
There are several distinct failure mechanisms.
Loose Hinge Fasteners
Road vibration and repeated operation may contribute to loosening where the fastening arrangement is inadequate or has deteriorated.
A loose hinge can shift under the weight of the lid, causing the free edge to drop or move sideways.
Inspection clue: Visible movement between the hinge leaf and its mounting surface, rather than movement within the hinge pin itself.
If the fasteners and attachment material remain sound, restoring the approved attachment may resolve the issue.
If the mounting holes have enlarged or the panel is damaged, simply tightening the fasteners may not provide a durable repair.
Worn Hinge Pins
A hinge pin that has developed excessive wear can allow movement between the hinge components.
The lid may sag toward the latch side or sit differently depending on whether it is being lifted or closed.
This is particularly relevant to toolboxes that are opened frequently.
Inspection clue: Play at the hinge joint while the hinge leaves remain securely attached.
When wear exceeds the manufacturer's acceptable condition, replacing the hinge assembly may be preferable to attempting to compensate through latch adjustment.
Bent Hinge Leaves or Damaged Continuous Hinges
Some toolboxes use separate hinges, while others use a continuous hinge extending along much of the lid.
An impact or excessive load on an open lid may deform these components.
A bent hinge can cause binding at certain opening angles even when the lid appears nearly aligned when closed.
On a continuous hinge, damage concentrated at one end may also change the movement of the entire lid.
Damaged Hinge Mounting Structure
The hinge may be intact while the sheet metal or reinforcement beneath it has cracked, distorted or pulled away.
This is a different level of failure.
Replacing the hinge alone will not restore its original mounting geometry if the supporting material can no longer carry the load.
Structural attachment damage should be assessed before installing replacement hardware.
When open-lid support fails
Gas struts provide force to assist lifting and support the lid through its designed range of motion.
They are especially common on top-opening aluminum toolboxes.
Over time, their performance may deteriorate because of internal pressure loss, seal wear, corrosion, mechanical damage or unsuitable loading conditions.
Signs of Insufficient Gas Strut Support
Possible symptoms include:
- The lid becomes noticeably heavier to lift.
- It no longer remains at its intended open angle.
- It slowly drops after being raised.
- The opening movement becomes inconsistent.
- The support force changes significantly after prolonged use.
- The gas strut shows a bent rod, damaged fitting or other visible defect.
A weak gas strut may not show obvious external damage.
Loss of support should therefore be evaluated from its behavior and installed geometry, not appearance alone.
Why the Strut May Have Failed
A gas strut relies on a pressurized cylinder, piston rod and internal sealing system.
Wear or damage to the rod seal can reduce gas pressure, lowering the available extension force.
Dust, corrosion and scratches on the rod can accelerate sealing damage.
SUSPA, a gas spring manufacturer, specifically identifies side loads, rod damage and severe vibration as conditions that can reduce gas spring service life. [2]
Mounting geometry also matters.
If the end fittings are misaligned, a gas strut can experience lateral forces rather than the predominantly axial loading it is designed to carry.
Can a Gas Strut Be Repaired?
Conventional sealed gas springs are generally replaced rather than opened and repaired in the field.
SUSPA confirms that its gas springs are not designed for routine disassembly or internal repair. [2]
External mounting brackets and compatible attachment hardware may be serviceable separately, depending on the design.
If the rod is bent, the cylinder is damaged or the gas spring has lost the required supporting force, use a correctly specified replacement.
Gas-strut force, geometry and replacement matching
A failed gas strut does not always mean insufficient force.
An unsuitable replacement can introduce an entirely different problem: the lid becomes difficult or impossible to close normally.
Excessive Force Rating
Gas struts are available in different extension-force ratings, commonly identified in newtons (N).
Choosing a higher rating without considering the lid and its mounting geometry can create excessive closing resistance.
It may also increase force on the lid attachment and hinge structure.
A stronger gas strut is not a universal upgrade.
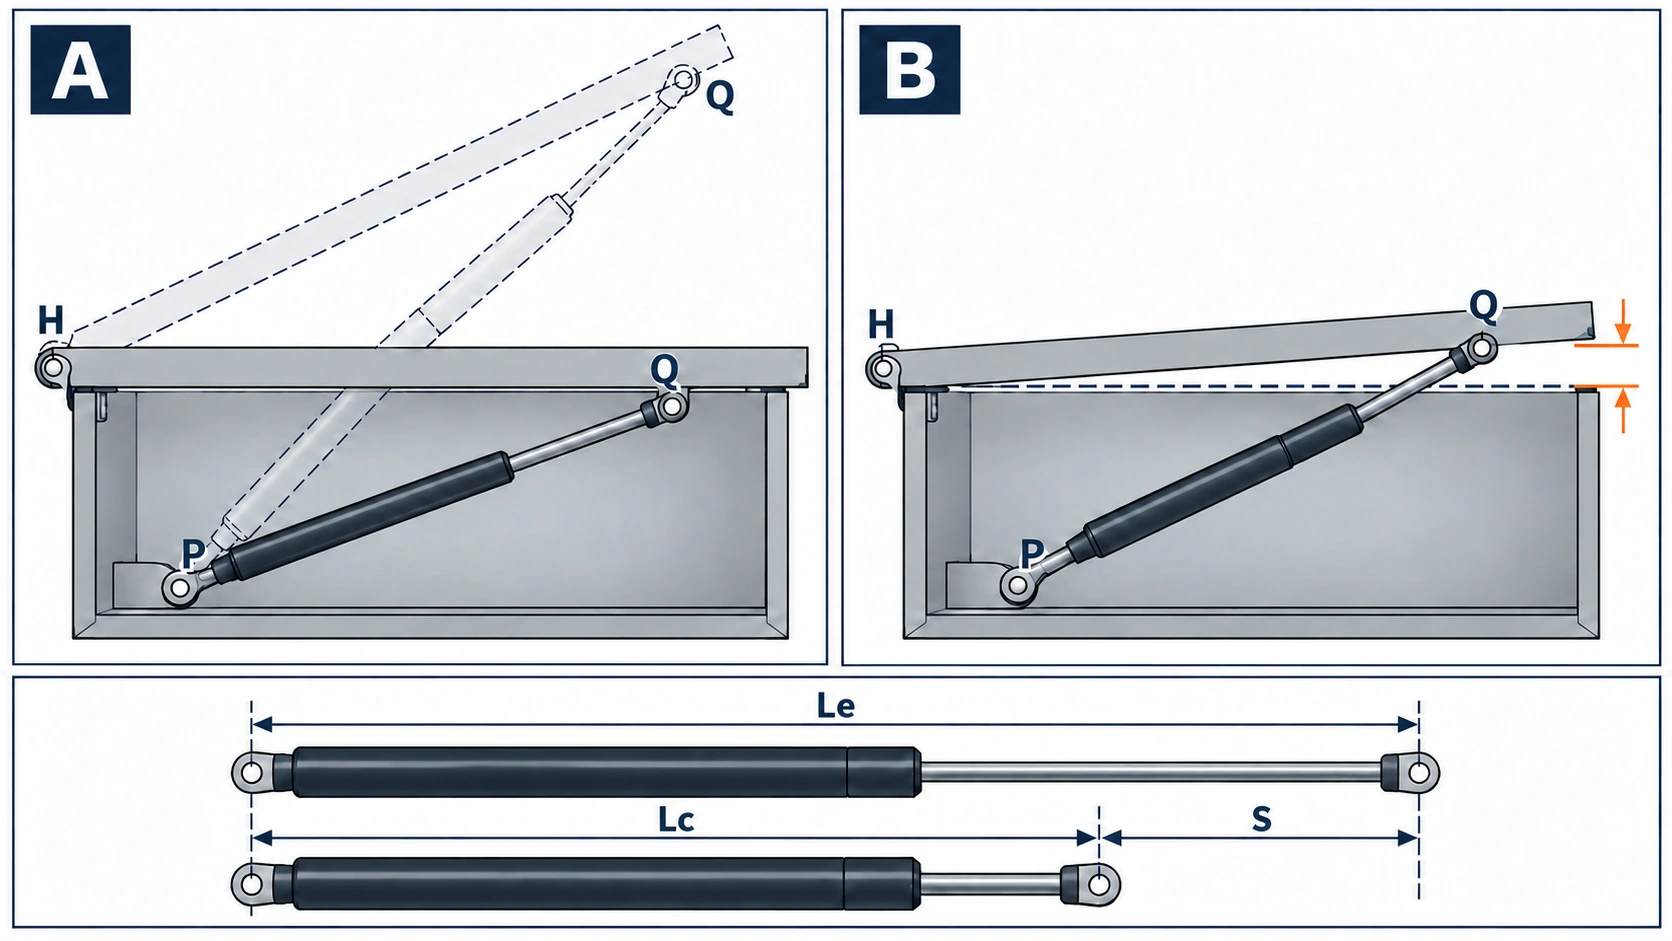
Incorrect Compressed Length
A gas strut must be able to reach the required closed position without mechanically bottoming out.
If the selected strut is too long when compressed, the lid may reach a hard stop before it can close fully.
The remaining gap may look like a latch or hinge problem.
However, the real limitation is the installed support mechanism.
Repeatedly forcing the lid closed can transfer substantial loads into the brackets, hinge or toolbox body.
Incorrect Extended Length or Stroke
The gas strut must also accommodate the intended open position.
If the strut reaches its extension limit before the lid reaches the designed opening angle, its end fittings and mounting points may be subjected to unintended forces.
The toolbox should have an appropriate opening-limit arrangement for its design. A replacement gas strut should not be used as an improvised structural stop.
Poor Bracket Position
Gas strut performance depends on the position of its attachments relative to the hinge.
The effective supporting moment comes from the strut force and its perpendicular distance from the hinge axis.
This means two identical gas struts can behave differently when their mounting brackets are placed differently.
A bracket positioned too close to the hinge may provide insufficient leverage during part of the opening cycle.
A bracket installed at an unsuitable angle can create binding, poor movement or premature component wear.
Why the Original Geometry Matters
If the lid previously operated correctly and the gas strut has not been changed, investigate whether a bracket has shifted or the lid geometry has changed before ordering a different force rating.
If the problem began immediately after a replacement, compare the new strut's length, force rating, end fittings and installed position with the specified original configuration.
The correct replacement should restore the intended motion—not compensate for a damaged mounting structure. [3]
What to Check Before Ordering a Replacement Gas Strut
Matching only the overall length is insufficient.
A compatible gas strut must suit the complete opening mechanism.
| Replacement parameter | Why it matters |
|---|---|
| Force rating (N) | Determines the available extension force |
| Extended length | Center-to-center dimension must accommodate the intended open position |
| Compressed length | Center-to-center dimension and specified end clearance must allow full closure |
| Stroke | Defines available rod travel, using consistent measurement datums |
| End fittings | Must match the designed bracket and connection |
| Mounting orientation | Affects seal lubrication and operating characteristics |
| Number of struts | Determines how support force is distributed |
| Bracket geometry | Determines leverage, travel and clearance |
| Environmental specification | Must suit exposure to water, dirt, temperature and vibration |
Match the Existing Specification When the Installation Is Unchanged
If the original strut arrangement worked correctly and the lid weight, hinges and mounting points remain unchanged, the existing part number is usually the best starting point.
Match the specified force, travel dimensions and connection details.
Recalculate When the Lid Has Been Modified
A modified lid may have a different mass or center of gravity.
For example, additional accessories attached to the lid can change the required supporting moment.
A replacement should then be selected against the updated lid weight, center of gravity, hinge position and available installation space.
A simple force-rating increase does not establish correct behavior throughout the opening arc.
Single-Strut and Dual-Strut Designs Are Different
Some compact toolboxes use one centrally positioned strut. Larger models may use two.
For a dual-strut design, replacement with a matched pair may be appropriate when both struts are the same age and one has deteriorated.
However, that practice should not be transferred blindly to a single-strut product or a design using different force ratings and positions.
Keep the configuration intended for the actual toolbox model.
Gas Strut Orientation
Gas spring manufacturers commonly recommend a rod-down orientation during the relevant installed condition to support internal seal lubrication.
There are application-specific exceptions.
The correct orientation should follow the selected gas strut and toolbox design rather than a universal rule applied to every lid.
Never cut, drill, heat, clamp the rod or attempt to open a pressurized gas strut. Do not detach a strut from an unsupported lid or try to hand-compress it to obtain a measurement. Use the part drawing and approved service procedure; a qualified technician should handle removal or isolation when required. [3]
Seven-step inspection and diagnostic table
The most effective troubleshooting order is to work from the complete enclosure toward individual components.
This prevents unnecessary part replacement.
Step 1 — Secure the Lid and Remove Internal Obstructions
Park the trailer on stable ground and secure the lid independently if its support mechanism is unreliable.
Check whether stored tools, trays, cables or other contents interfere with the lid.
A misplaced item is a simple possibility worth excluding before investigating the mechanism.
Step 2 — Compare the Lid and Body Geometry
Observe the lid in its natural closed position without forcing the lock.
Compare corner heights, edge gaps and visible hinge alignment.
If the lid is noticeably twisted or one corner remains raised, inspect the mounting support and body structure first.
Step 3 — Check the Mounting System
Inspect accessible attachment points for uneven support, deformation, damaged brackets and fastener movement.
Pay attention to problems that developed immediately after mounting or following a bracket change.
If correcting the support arrangement is necessary, maintain proper support and secure attachment of the entire toolbox.
Step 4 — Inspect the Hinges
With the lid securely supported, examine hinge leaves, pins, fasteners and mounting surfaces.
Distinguish movement within the hinge from movement of the hinge assembly relative to the toolbox body.
Visible wear or bent components point toward replacement; damaged mounting material requires a separate structural assessment.
Step 5 — Examine the Latch and Striker
Check the catch and striker for contact marks, misalignment or visible damage.
If the lid is square but the latch misses the striker, a permitted adjustment may be sufficient.
If the lid is distorted, correct the geometry before attempting to reposition the latch.
Step 6 — Inspect Gas Strut Operation and Fit
Examine the strut and accessible brackets for damage, misalignment and interference.
Record whether the lid drops while opening, binds during travel or reaches an abrupt stop near closure.
The pattern helps distinguish insufficient support from incorrect length, force or bracket geometry.
Step 7 — Verify the Completed Operation
After the identified condition is corrected, confirm that the lid:
- Moves through its intended opening range without binding
- Remains supported as designed
- Does not place abnormal stress on the hinges or brackets
- Reaches its closed position without excessive force
- Engages the latch securely
- Does not interfere with the trailer or adjacent equipment
A successful repair restores the entire opening and closing function, not just one symptom.
Toolbox Lid Troubleshooting: What Each Result Means
| Observed condition | Most relevant areas to investigate | Diagnostic implication |
|---|---|---|
| One corner rises after the box is mounted | Support brackets, body geometry, mounting points | Mounting-induced distortion is possible |
| Lid gap is uneven before latch engagement | Hinges, lid frame, box opening | Alignment or structural issue |
| Lid sits squarely but latch misses the striker | Latch, striker, local mounting | Closure hardware may need adjustment or replacement |
| Lid rubs against one side during movement | Hinges, lateral alignment, body distortion | Opening path has changed |
| Lid closes normally but falls when opened | Gas strut and attachment geometry | Insufficient support is likely |
| Lid is unusually difficult to push closed after strut replacement | Strut force, compressed length, bracket position | Replacement may be incompatible |
| Lid reaches an abrupt hard stop before fully closing | Strut travel, bracket interference, internal obstruction | Mechanical interference needs correction |
| Hinge leaf moves against the mounting surface | Hinge fasteners and supporting panel | Attachment integrity may be compromised |
| Hinge pin has excessive movement | Hinge joint | Wear may require hinge replacement |
| Bracket or lid panel is cracked or permanently bent | Structural assembly | Component replacement alone may not restore function |
These are diagnostic indicators rather than automatic verdicts.
For example, a gas strut may be weak because its seal has deteriorated, while its attachment bracket is also misaligned.
Replacing the strut without correcting the bracket can shorten the life of the new component.
Adjustment, replacement and operating conditions
The decision depends on whether the original geometry and component function can be restored.
Routine Maintenance or Adjustment
A relatively minor correction may be sufficient when:
- The box and lid remain structurally sound.
- An adjustable striker has moved out of position.
- Accessible hinge fasteners have loosened without damaging their mounting holes.
- Debris or misplaced contents interfere with normal closure.
- A compatible serviceable component requires manufacturer-approved adjustment.
After correction, the lid must operate normally across its full range.
Replace Individual Hardware
Component replacement may be appropriate when:
- A hinge pin or hinge assembly is excessively worn.
- A latch mechanism is damaged or cannot engage reliably.
- A gas strut has lost its required supporting force.
- A gas strut rod, cylinder or end fitting is damaged.
- A support bracket is defective but the surrounding body remains structurally sound.
Replacement parts should match the model's geometry and loading requirements.
Structural Inspection Is Necessary
Further inspection is required when:
- Mounting holes are elongated or torn.
- The hinge mounting area is cracked.
- The body opening is visibly twisted.
- The lid frame has permanent deformation.
- Welded or joined structures show separation.
- Mounting brackets cannot securely support the box.
In these cases, replacing hinges or gas struts may not solve the problem.
Replace the Lid or Complete Toolbox When Necessary
A replacement lid may be appropriate if the body remains sound but the lid is permanently damaged and a compatible replacement is available.
Complete toolbox replacement becomes more appropriate when the main enclosure has lost structural integrity, the geometry cannot be reliably restored, or damage extends across multiple critical attachment points.
A toolbox that cannot close and lock reliably should not be used for unsecured equipment storage during transport.
Why Trailer Operating Conditions Can Accelerate These Problems
A toolbox that functions properly immediately after installation still experiences loads during normal trailer operation.
Road Vibration
Repeated vibration can affect fasteners, brackets and moving joints.
The risk depends on the mounting arrangement, operating environment and mechanical condition.
Regular inspections should include visible hinge attachments, latch engagement and mounting hardware.
Frequent Opening and Closing
Toolboxes used by service technicians and contractors may be opened many times each day.
The repeated movement can accelerate hinge and latch wear.
Gas strut performance may also decline over its service life.
Heavy Contents and Mounting Loads
A toolbox carrying dense tools subjects its mounting structure to higher forces during road travel.
If the support arrangement allows the body to deform, the lid opening can gradually lose alignment.
The mass of the contents should remain within the specified capacity of both the toolbox and mounting system.
Dirt, Water and Coastal Environments
Contamination can restrict latch movement and increase wear around hinges.
Corrosion or surface damage on a gas strut rod can degrade its sealing performance.
In exposed environments, maintenance should focus on preserving free movement, secure attachment and correct operating geometry.
Interference with Nearby Trailer Components
The lid's opening range must also remain clear of nearby equipment.
A lid that contacts a trailer body panel, spare wheel, rack or other component may repeatedly load its hinges and support brackets in an unintended direction.
Correct installed clearance is therefore part of the long-term reliability of the lid mechanism.
GOODIN: evaluate the installed system
For trailer manufacturers, distributors and aftermarket suppliers, a toolbox is more than an aluminum storage enclosure.
Its long-term usability depends on how the lid, hinges, locking mechanism, gas strut and mounting structure function together.
GOODIN's aluminum toolbox range includes different enclosure and opening configurations. One relevant example is the GDA006 Aluminum Trailer Tongue Tool Box.
GOODIN GDA006 — Top-Opening Aluminum Tongue Toolbox
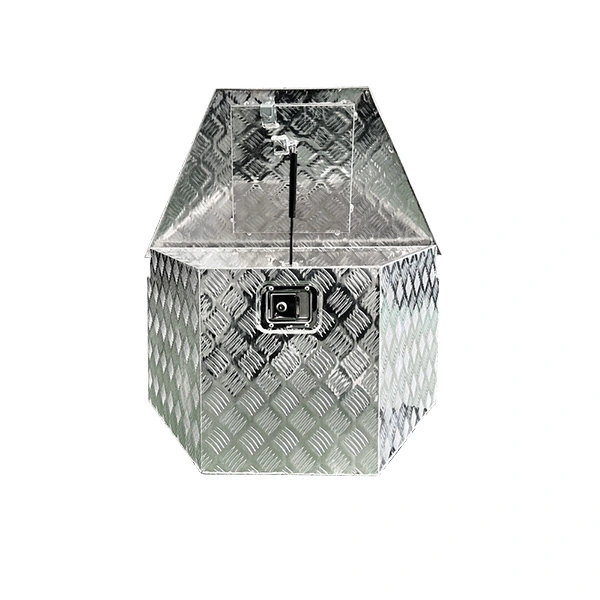
GDA006 uses a tapered checker-plate aluminum body with a top-opening lid, a centrally positioned gas strut and a recessed lockable front latch.
Its published overall dimensions are 830 × 490 × 460 mm. [4]
These visible features do not establish the strut force, length, stroke, fitting specification, permitted mounting torque or hinge/latch service limits. Obtain the current model drawing and component identification before approving a replacement.
These features create several important installation and service considerations.
Mounting support
The tapered body is suited to evaluation for trailer tongue storage, but the actual support points must preserve the shape of the enclosure.
Lid opening geometry
The central gas strut supports the upper lid. Its mounting position and operating travel should be maintained when replacing components.
Latch engagement
The recessed front latch must align correctly after the box is secured to its mounting structure.
Operating clearance
The lid must open without contacting nearby trailer equipment, and its movement should remain smooth throughout the full opening cycle.
What OEM and Distributor Buyers Should Define
For repeat orders or customized toolbox programs, the following information can reduce future lid-operation complaints:
| Specification area | Useful information |
|---|---|
| Enclosure geometry | Body and lid dimensions, hinge configuration |
| Mounting system | Approved mounting points, support surfaces and bracket arrangement |
| Gas strut | Force rating, length, stroke, fittings and mounting positions |
| Latch | Catch and striker configuration, adjustment provision |
| Replacement parts | Compatible hinges, locks, gas struts and brackets |
| Installed clearance | Full lid-opening envelope with adjacent trailer equipment |
| Functional inspection | Acceptable alignment, latch engagement and lid support |
These specifications are especially valuable when a toolbox design is used across multiple trailer models with different mounting arrangements.
Diagnosing Repeat Complaints
If a customer reports that the lid will not close after installation, useful information includes:
- Exact toolbox model
- Whether the problem existed before mounting
- Photographs of the closed lid and the uneven gap
- Mounting bracket and fastener locations
- Hinge and latch condition
- Gas strut identification and mounting positions
- Whether the lid has been modified or carries additional weight
This information helps determine whether the correct response is an approved adjustment, replacement hardware or further inspection of the enclosure.
A damaged gas strut should be replaced with a compatible component.
A twisted mounting arrangement should be corrected at the support.
A worn hinge should not be compensated for by increasing gas strut force.
The goal is to restore the toolbox's designed opening and closing behavior—not merely make the lid move again.
Explore GOODIN GDA006 Aluminum Trailer Tongue Tool Box and GOODIN Aluminum Tool Box Range.
FAQ and the repair decision
Why did my toolbox lid become misaligned after mounting it?
Uneven support, local mounting deformation or changes in the hinge position can alter the relationship between the lid and body.
Compare the perimeter gaps and inspect the mounting surfaces before replacing lid hardware.
If the problem appeared immediately after mounting, the support arrangement is an important starting point.
Can overtightening mounting bolts stop a toolbox lid from closing?
Yes, if the mounting arrangement concentrates force into the enclosure and distorts its shape.
This can change lid alignment and prevent the latch from reaching its intended position.
The correction should restore proper support and secure attachment rather than apply more tightening force.
Why does my toolbox lid close normally but refuse to stay open?
The gas strut may no longer provide sufficient support, or its mounting geometry may be unsuitable.
Inspect the strut, end fittings and brackets with the lid independently supported.
A replacement must match the intended force and dimensions.
Will a stronger gas strut fix a sagging toolbox lid?
Not if the sagging comes from a worn hinge, damaged attachment point or twisted enclosure.
A higher-force strut may make closing difficult and place additional stress on the hinges and brackets.
Identify the actual failure before changing the strut specification.
What causes a toolbox lid to stop before it fully closes?
Possible causes include an incorrectly sized gas strut, bracket interference, a displaced hinge, trapped contents or a structural obstruction.
An abrupt hard stop after a strut replacement should prompt an inspection of compressed length, travel and bracket geometry.
Do not force the lid past the obstruction.
Should I replace both toolbox gas struts if one fails?
For a two-strut arrangement using matched components, replacement as a matched pair is often appropriate.
A single-strut toolbox requires one correctly specified replacement.
The appropriate configuration depends on the model's original support arrangement.
Can I adjust the toolbox latch instead of replacing the lid?
Yes, when the lid and body remain correctly aligned and the latch design includes an approved adjustment.
If the lid opening is distorted or the hinge mounting is damaged, adjusting the latch alone will not correct the underlying problem.
When should the entire toolbox be replaced?
Complete replacement may be necessary when the main body is permanently distorted, critical structural joints are damaged, or the lid and mounting geometry cannot be restored reliably.
A worn hinge or failed gas strut does not automatically require replacing a structurally sound box.
Conclusion: Diagnose the Geometry Before Replacing the Hardware
A trailer toolbox lid that will not close properly may be showing the result of several different failures.
Uneven mounting support can distort the enclosure. Worn hinges can change the lid's movement path. A misaligned latch can prevent secure closure even when the lid remains square. Gas struts can lose supporting force—or prevent proper closure when their specifications or mounting geometry are incorrect.
These faults require different solutions.
Begin with the lid and body alignment, inspect the mounting conditions, then evaluate the hinges, latch and gas strut according to the observed symptoms.
Replace individual hardware when the supporting structure remains sound. Investigate the complete enclosure when the opening geometry or critical attachments are damaged.
A properly maintained toolbox is not simply one whose lid can be pushed shut. It is one that opens smoothly, stays supported, closes without excessive force and locks securely in its installed condition.
Sources & Further Reading
Manufacturer guidance supports general diagnosis, not approval of a specific GOODIN replacement part. GDA006 public data and supplied photos do not establish gas-strut force, travel dimensions or hinge/latch service limits.
Why a Weather-Resistant Trailer Tool Box Still Leaks: How to Find the Real Entry Point
Related Article