Why a Weather-Resistant Trailer Tool Box Still Leaks: How to Find the Real Entry Point
In this guide
You open your trailer toolbox after a rainy trip and discover water collected in the bottom. The tools are wet, the packaging is damaged, and moisture has begun reaching items that were supposed to stay protected.
Yet the lid has a rubber seal. The lock closes normally. The aluminum body shows no obvious holes.
So where is the water coming from?
A leaking trailer toolbox is not necessarily suffering from a failed lid gasket. Water can pass through a lock mechanism, travel around hinge fasteners, follow a poorly sealed joint, or enter through mounting holes. The lid may also lose its original sealing contact after the box is installed on an uneven support.
The challenge is that the place where water collects is often not the place where it entered.
Before replacing the gasket or applying sealant around the entire box, identify the first entry point. The location and conditions of the leak will usually tell you much more about the appropriate repair.
Installation & Maintenance · Article 03 · Diagnose the first entry point before applying sealant.
Three leak situations and the complete weather seal
Three different situations show why water intrusion can initially be difficult to explain. The first two are illustrative diagnostic scenarios, not independently verified owner reports; the third is a documented owner discussion.
Consider a large truck toolbox repeatedly collecting water—sometimes an inch or more. Applying flexible sealant to the interior corners does not solve the problem.
The unresolved possibilities include old lock openings, rivets and the lid perimeter. If the box lacks a conventional lid gasket, the source still needs to be established rather than inferred from the puddle.
A second illustrative situation involves a newly purchased T-handle toolbox lock leaking through the handle shaft. Replacing the lock does not necessarily produce a watertight installation.
One verified owner discussion appeared on Caravaners Forum in May 2025. A caravan owner initially attributed water entry to toolbox hinges, but later corrected the description: the water was coming through the latches, not the hinges. A gentle hose-mist check reproduced entry. Other contributors discussed seal contact and recessed lock openings. These are owner observations, not a controlled product test. [1]
These situations illustrate three distinct possibilities:
- Water can bypass the main lid opening through another penetration.
- A new lock can leak even when its mounting flange appears sealed.
- A leak noticed near a hinge does not prove that the hinge is the entry point; the forum correction shows why confirmation matters.
That is why the first useful question is not whether the toolbox has a gasket.
It is which part of the enclosure allows water to cross from the outside to the inside, and under what conditions.
A Lid Gasket Is Only One Part of the Weather Seal
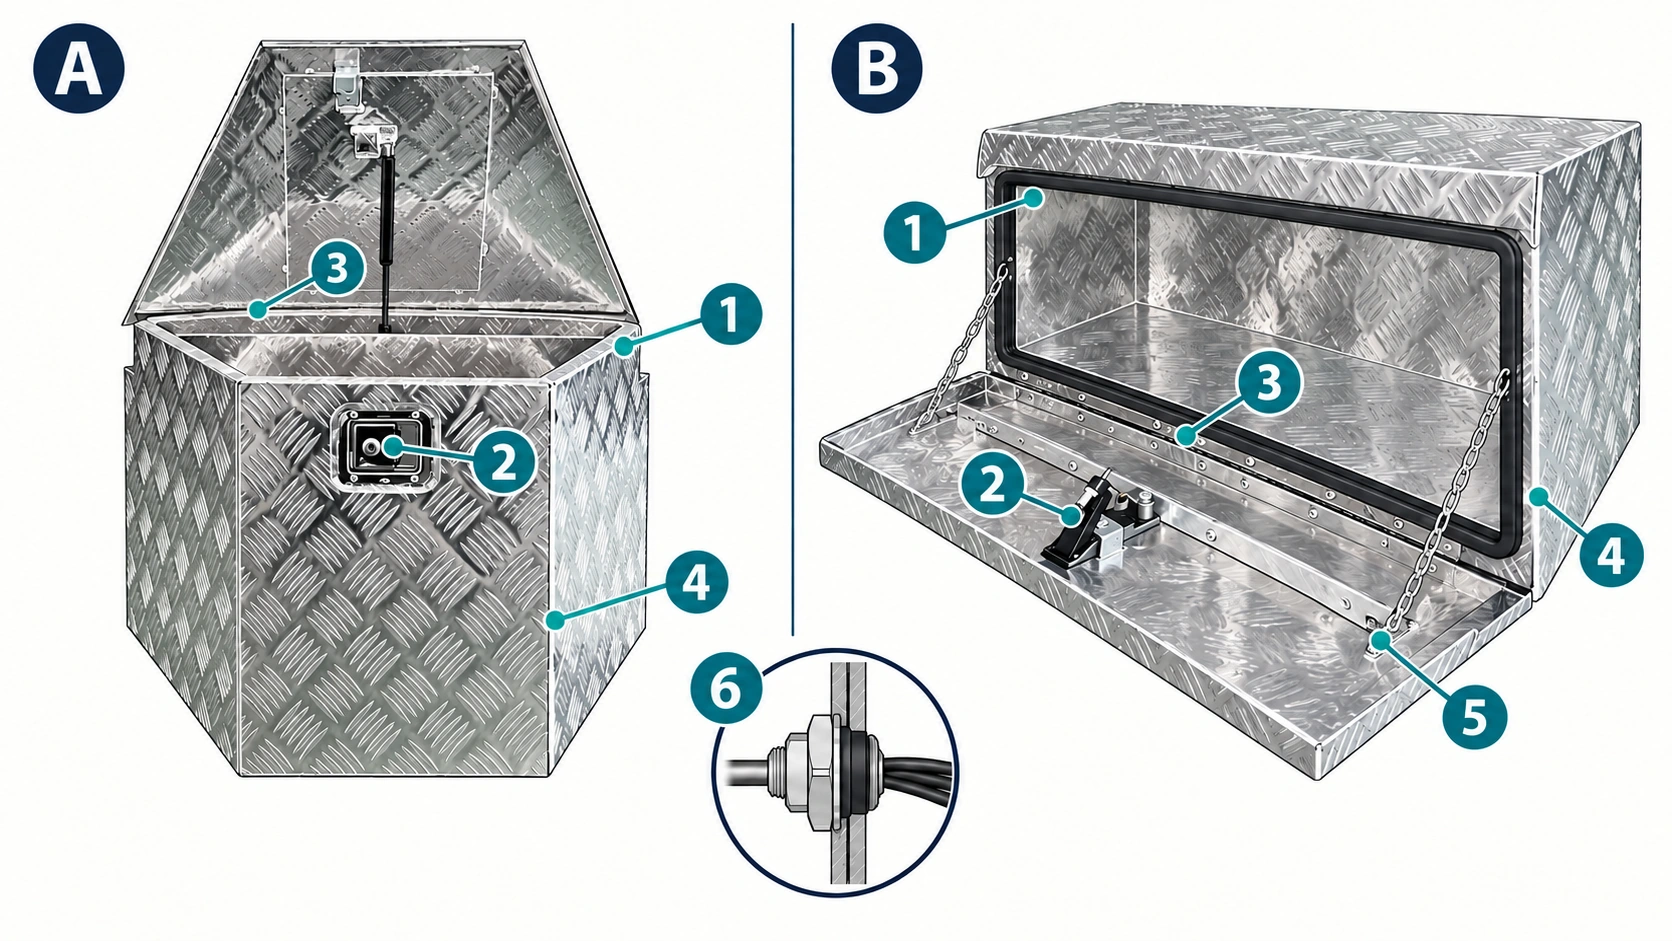
A typical outdoor trailer toolbox contains several potential water-entry paths.
Depending on the design, these may include:
- The lid or door perimeter
- Lock and latch openings
- Hinge attachment points
- Rivets, bolts and other fasteners
- Welded or mechanically joined body seams
- Mounting holes and any added cable penetrations
A gasket protects only the sealing interface it is designed to cover.
It cannot prevent water from passing through an unsealed lock shaft or a poorly fitted fastener elsewhere on the box.
Weather Resistance Depends on the Complete Enclosure
A properly designed toolbox often uses several features together.
The lid geometry redirects rainfall away from the opening. A gasket closes the remaining gap between the lid and body. Latches provide the contact needed to compress that gasket. Hinges keep the lid aligned, while sealed hardware penetrations prevent alternative entry paths.
Commercial toolbox designs illustrate how these features work together. Buyers Products, for example, offers underbody boxes using hidden hinges, replaceable gasket systems and compression latches to protect stored equipment from the weather. [2]
WEATHER GUARD’s aluminum saddle-box specification likewise describes a weather seal and latching system as coordinated features—not a universal waterproof guarantee. [3]
If one part no longer performs its function, the presence of the other components may not be enough.
This is also why a lockable, corrosion-resistant aluminum box should not automatically be considered watertight.
The aluminum body may resist corrosion while the mechanical openings still admit water.
Check lid contact, not just the gasket
The lid perimeter is an obvious place to investigate, particularly when water appears after ordinary rainfall.
However, a gasket can look intact while failing to form continuous contact with the mating surface.
Uneven Compression
Most compressible toolbox seals require the lid or door to press against them within the designed compression range.
If the latch does not pull the lid fully closed, part of the perimeter may remain insufficiently compressed.
The opposite problem is also possible. A misadjusted latch may concentrate excessive force in one area while leaving another area poorly supported.
The result can be a box that feels firmly locked yet has a narrow water-entry gap.
What to check: Inspect the gasket for a continuous contact pattern. Look for sections that remain visibly raised, areas that appear permanently flattened, and places where the lid-to-body gap differs.
An approved paper-strip contact check can sometimes help identify a section with noticeably less resistance than neighboring areas. It is a comparative check, not a measurement of waterproof performance.
Misplaced or Damaged Gasket
A gasket can also leak because it has:
- Shifted out of its intended channel
- Torn near a corner
- Developed an open joint
- Been compressed permanently after long service
- Become contaminated by debris
- Separated from its mounting surface
Pay particular attention to corners and gasket joints.
Water can follow a narrow discontinuity even when most of the perimeter remains properly sealed.
The Lid May No Longer Close Evenly
If gasket contact is poor along an entire edge rather than at one damaged section, inspect the lid alignment and latch operation.
Replacing a sound gasket will not necessarily correct a bent lid or distorted opening.
Diagnostic distinction: A localized leak at a torn gasket section suggests a seal problem. A long section of inconsistent contact, particularly after installation or impact, points toward alignment or structural deformation. [6]
Distinguish lock, hinge and body entry paths
Locks and latches are frequently overlooked during leak diagnosis.
They may have an external gasket between the lock housing and the toolbox panel, but some designs also contain moving internal components that create additional water paths.
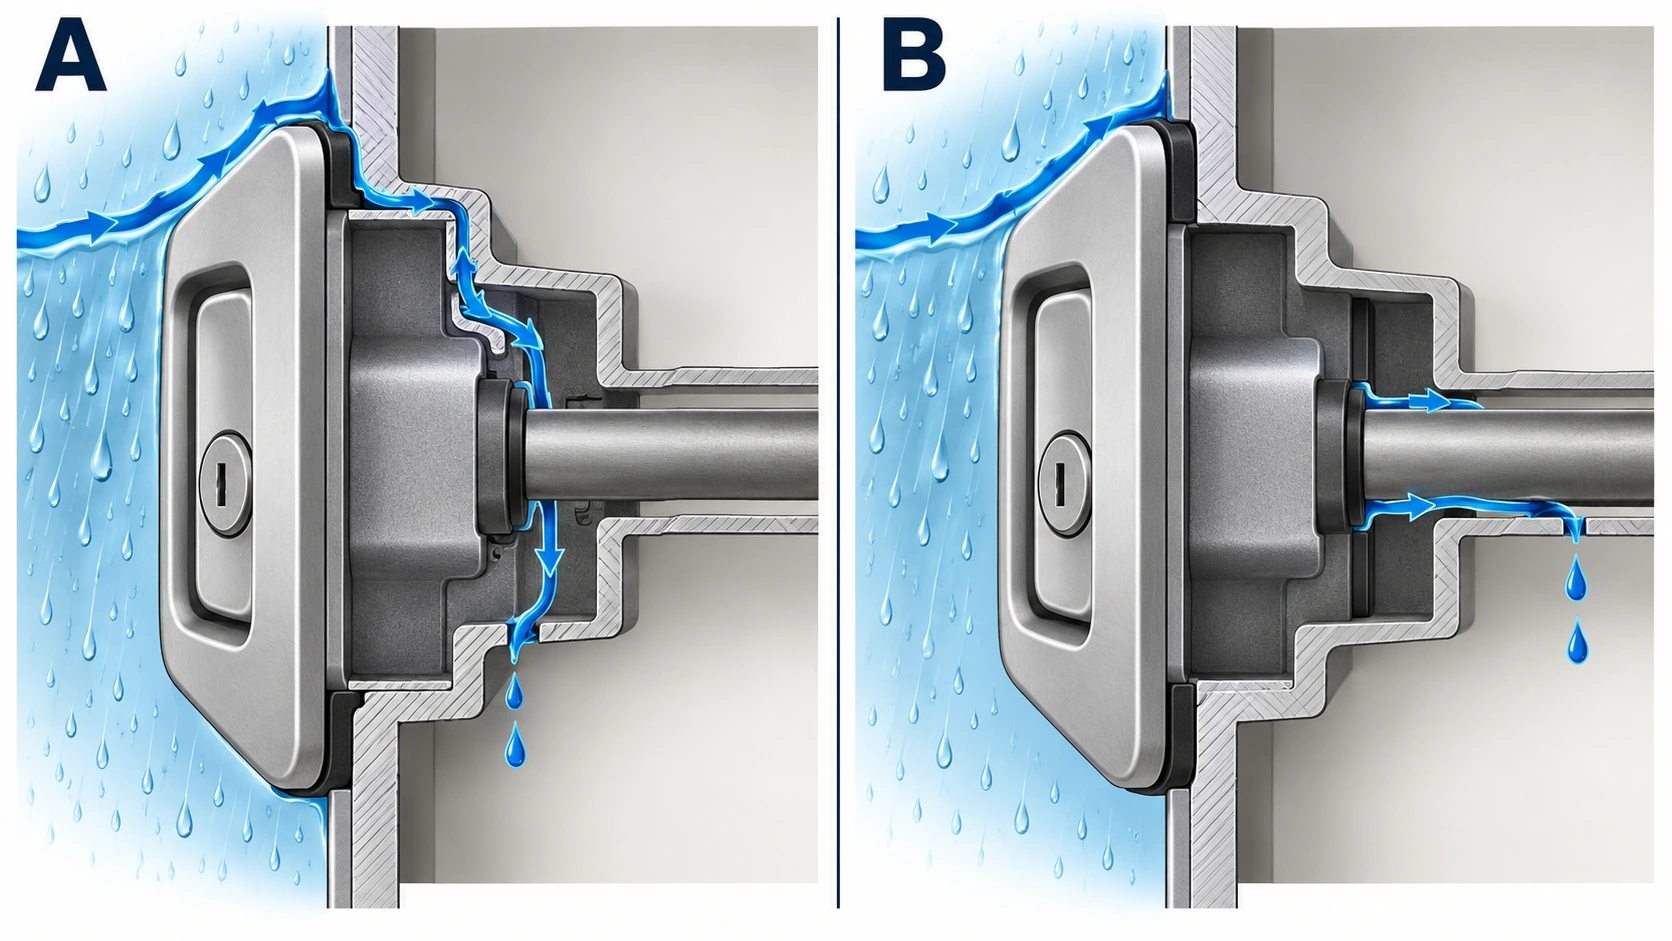
Flange Leakage and Shaft Leakage Are Different
Consider a recessed T-handle or paddle-lock arrangement.
The external flange sits against the toolbox panel. A gasket or sealing interface may prevent water from passing between the flange and the sheet metal.
But water can potentially enter through the moving handle or shaft mechanism itself.
This explains why fitting a new lock and tightening the mounting hardware does not always eliminate water intrusion.
If water travels through the shaft opening, sealing only the outer flange may leave the actual problem untouched.
Why Recessed Locks Can Collect Water
Some recessed latch housings form a shallow pocket.
When mounted on a horizontal or upward-facing surface, this pocket may collect rainwater.
Water remains in contact with the handle shaft or other openings for longer than it would on a vertical face.
The installation orientation therefore affects exposure.
A latch designed with a particular mounting position or protective cover should not automatically be assumed suitable for every toolbox surface.
What the Inspection Results Mean
If water first appears around the inside of the lock mounting flange, investigate the flange gasket, mounting surface and fastener seal.
If water emerges from the moving shaft or handle connection while the flange remains dry, the internal lock sealing arrangement is the more likely concern.
If the lock works correctly but has a damaged or displaced replaceable gasket, a compatible gasket replacement may be sufficient.
However, visible corrosion, damaged internal seals, excessive handle movement or repeated leakage through an integral shaft assembly may require replacement of the complete latch mechanism.
Avoid tightening a latch indefinitely to stop a shaft leak. Greater clamping force at the flange cannot reliably repair a failed internal shaft seal and may distort a thin aluminum panel.
Manufacturer latch literature can identify separate panel and actuator sealing features, but that does not establish the internal construction of a particular GOODIN latch. Obtain the selected hardware drawing before specifying an internal seal or replacement. [6]
Water Near the Hinge Does Not Always Come Through the Hinge
A wet hinge area is another common source of incorrect diagnosis.
The hinge pin itself may not pass into the toolbox interior. Water can instead travel through the attachment holes, beneath the hinge leaf or across a gap between the lid and body.
Three conditions deserve separate attention.
Hinge Fastener Penetrations
A hinge may be fixed by rivets, screws or bolts that penetrate the toolbox wall.
Where those penetrations are not adequately sealed, water can track around the fastener shank.
A slow leak may produce small droplets around individual fasteners before water travels down the inside wall.
What to look for: Moisture appearing directly around a particular fastener or a line of fasteners while adjacent lid-seal areas remain dry.
Hinge-Side Gasket Compression
Some lids compress a gasket differently along the hinge side than along the latch side.
If the hinge position changes or the lid becomes distorted, the gasket may lose continuous contact near the rear edge.
Water may then appear to enter through the hinge even though the actual opening is between the lid and body.
Hinge Wear or Misalignment
Road vibration, repeated opening and closing, accidental impacts or excessive load on an open lid can affect hinge alignment.
A damaged hinge may allow the lid to sit unevenly against the seal.
In this case, replacing the gasket alone may provide only temporary improvement.
The useful distinction is whether water crosses a hinge fastener, the hinge-side lid gap, or another nearby joint.
Each requires a different correction.
Rivets, Bolts and Body Seams Can Create Hidden Water Paths
If the lid, lock and hinge areas remain dry during inspection, continue toward the fixed body.
Water can pass through a small opening that is difficult to see from the outside.
Rivets and Bolt Holes
A rivet or bolt does not automatically make a watertight connection.
Water may follow the interface between the fastener and panel, particularly where a sealing washer, gasket or approved joint seal has failed.
Road vibration can also loosen certain fastened connections over time.
Look for water trails around the inside ends of fasteners, especially those exposed on horizontal or upward-facing surfaces.
Mounting bolts passing through the base deserve attention if water appears after road travel or wet conditions beneath the trailer.
Body Seams and Welded Corners
Toolbox bodies may use welded joints, folded edges or mechanically joined panels.
A discontinuity in a seam can become a water path even when the surrounding aluminum appears undamaged.
For example, water may enter near an upper corner, follow the inside wall and collect at the opposite end of the floor.
Applying sealant to the wet floor corner would not correct the upper entry point.
Where a seam is visibly cracked, separated or structurally damaged, the condition requires more than a cosmetic bead of sealant.
Added Holes and Previous Modifications
Toolboxes are sometimes modified to accommodate cables, mounting brackets or accessories.
Unused holes, poorly sealed cable openings or hardware removed during earlier repairs can become entry points.
These modifications should be included in the inspection rather than focusing exclusively on the original factory components.
When mounting changes sealing geometry
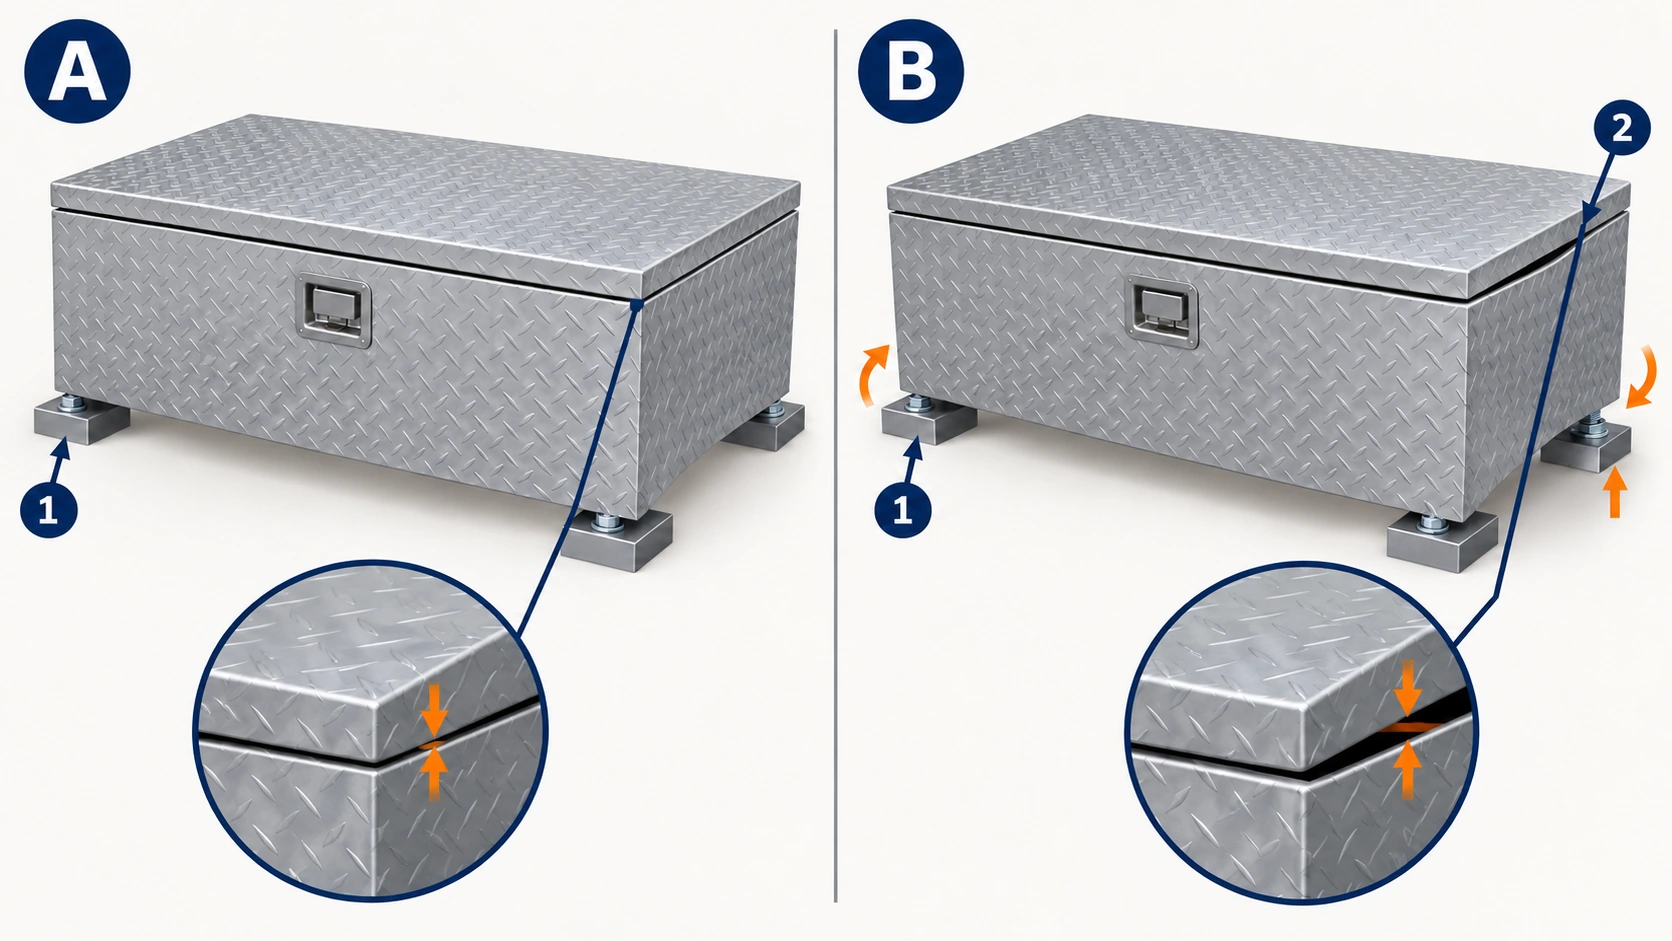
Yes. An enclosure can be properly assembled before installation yet lose its intended sealing geometry when attached to a trailer.
This is particularly important for lightweight aluminum boxes with relatively large panels.
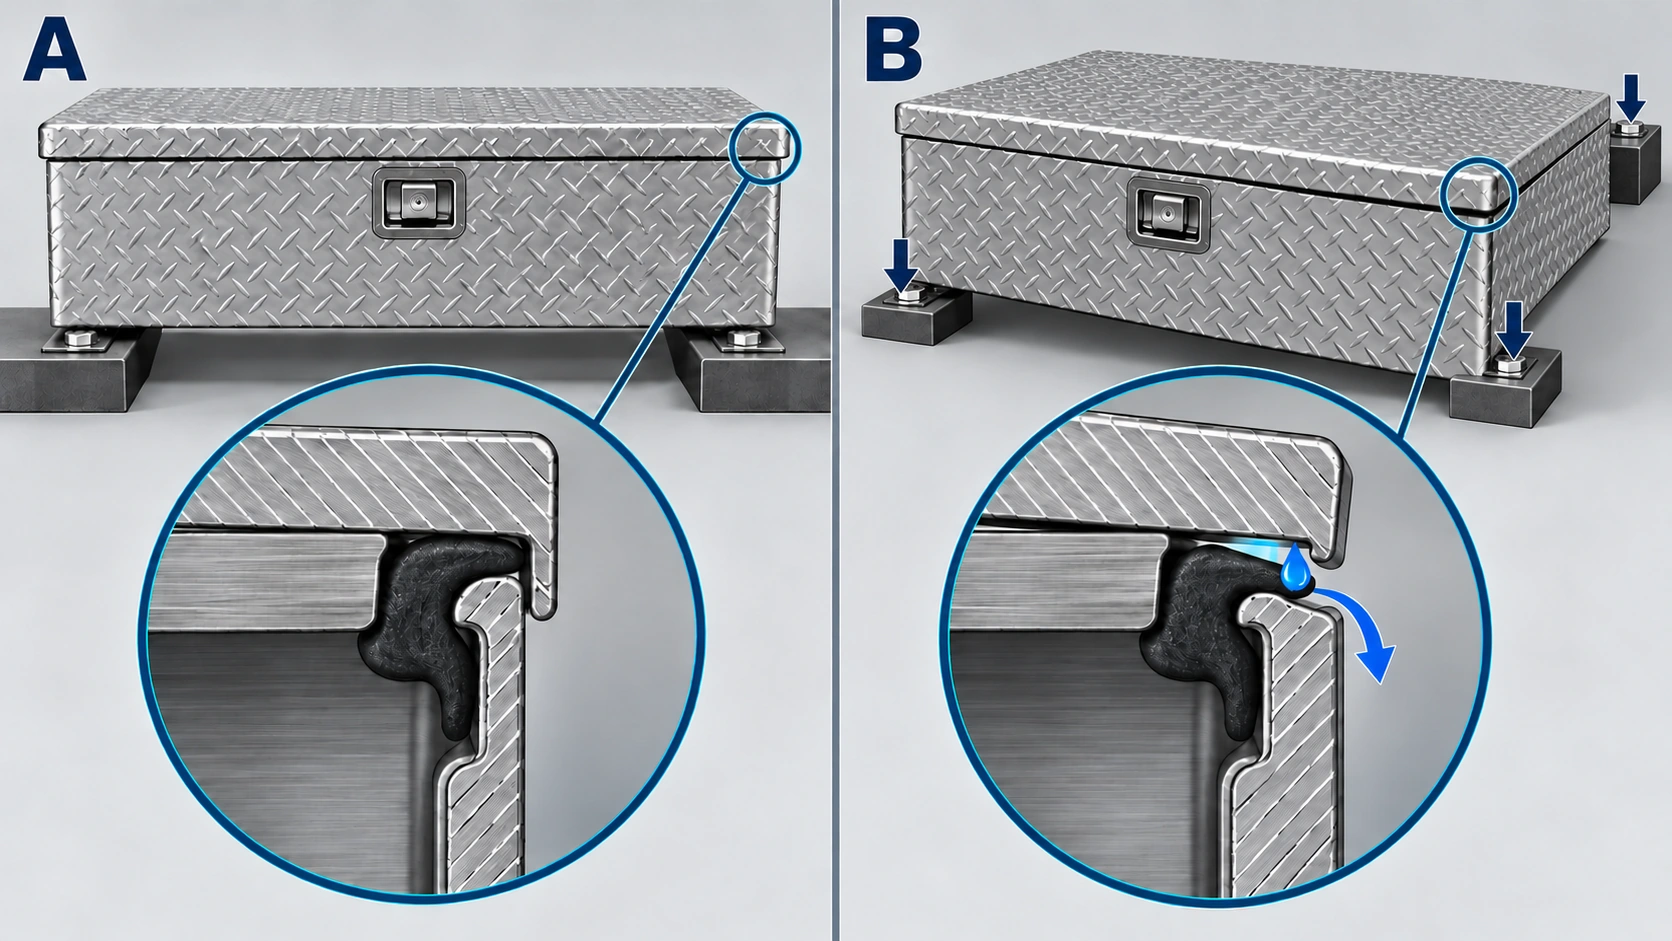
Uneven Mounting Support
Suppose a toolbox is mounted across two support surfaces that are not level with each other.
If the mounting hardware pulls the base firmly against both surfaces, the box may experience twisting.
The deformation may be small enough to escape casual inspection but sufficient to alter the relationship between the lid, hinge and sealing perimeter.
A box that closed evenly before installation may then have a gap near one corner.
Excessive Local Fastener Force
A mounting bolt concentrates force near its attachment point.
If the attachment arrangement does not distribute the load appropriately, the surrounding panel may deform.
The result can include local bending, changed door alignment or distortion around an opening.
Adding more tightening force is not necessarily the solution.
Loaded-Box and Road Conditions
A toolbox carrying heavy equipment experiences more than its empty weight.
Road vibration and repeated dynamic loading act through the mounting brackets and supporting structure.
If the box is inadequately supported or installed in a location where the mounting structure moves excessively, its alignment may change over time.
How to Recognize Installation-Related Distortion
Several findings point toward a mounting problem:
- The lid closed evenly before installation but developed a gap afterward.
- One corner appears raised relative to the others.
- Gasket contact differs consistently across opposite corners.
- The box has visible local deformation around mounting points.
- The leak appeared after a bracket change, impact or mounting repair.
Inspect the support arrangement and enclosure geometry together.
Do not loosen or remove a mounted box without first supporting its weight and contents. If a mounting adjustment affects the trailer structure or load-bearing brackets, it should be corrected using an appropriate mounting design.
A watertight lid depends on the shape of the complete box, not only the condition of its rubber seal.
Separate rain, road spray and pressure washing
The circumstances under which water enters provide valuable diagnostic information.
A box that stays dry during stationary rainfall may still admit water after highway travel.
A box that withstands ordinary road spray may leak when hit directly with a high-pressure washer.
These are not equivalent tests.
Ordinary Rainfall
Rain typically reaches exposed top and side surfaces, with wind changing the direction of impact.
On a top-opening trailer tongue box, pay close attention to the lid perimeter, recessed latch and upper hinge region.
Water collecting on a flat or recessed feature may also remain in contact with an opening after rainfall ends.
Road Spray
Road spray can strike the enclosure from below, behind or at an angle.
An underbody toolbox may receive water and road debris from directions that a top-mounted chest rarely experiences.
This is particularly relevant for lower door edges, exposed fasteners, mounting holes and the underside of door seals.
The pressure and direction of moving spray can also challenge joints differently from water running down a stationary surface.
High-Pressure Washing
A concentrated pressure-washer jet can force water toward gaps that normally shed rainfall.
Directing such a jet at a gasket, lock opening or hinge is not equivalent to leaving the toolbox in the rain.
A leak produced only by high-pressure washing does not, by itself, establish that the box is defective under ordinary service conditions.
However, it may reveal that the selected enclosure is unsuitable for an application requiring frequent industrial washdown.
For that application, the required water-resistance level should be defined and verified as part of the product specification.
Use the Exposure Pattern as Evidence
| When water appears | Areas to investigate first |
|---|---|
| After stationary rainfall | Lid perimeter, upper seams, recessed locks, horizontal openings |
| After driving on wet roads | Door seals, exposed fasteners, underside penetrations, mounting interfaces |
| After pressure washing | Directly exposed lock shafts, gasket interfaces and joints |
| After heavy cargo is added or brackets are changed | Mounting distortion, lid alignment, local panel deformation |
| Only after repeated opening in wet weather | Water retained around the lid, hinge or gutter and carried inside during opening |
These patterns are starting points, not final diagnoses. The actual entry point still needs to be confirmed.
Find the first entry point: six steps and diagnosis table
A controlled inspection is usually more useful than covering every joint with sealant.
The aim is to identify the first location where water appears inside the enclosure.
Step 1 — Empty, Clean and Dry the Box
Remove stored equipment and dry the interior walls, corners and floor.
Clean loose dirt from the gasket and accessible water channels.
Look for mineral deposits, corrosion marks, dirt tracks or staining that may reveal earlier water movement.
Do not assume the lowest wet area is the entry point.
Step 2 — Establish a Baseline
Close and latch the box normally. Support the open lid or door as specified whenever inspecting inside; do not rely on a suspect gas strut, hinge or door chain.
Before applying water, examine the perimeter for uneven gaps, loose hardware or visibly damaged seals.
Place small strips of dry absorbent paper at selected internal locations where they will not interfere with the lid or lock.
Suitable locations include the upper corners, below the latch, near hinge fasteners and along suspected seams.
The paper can make the earliest sign of moisture easier to identify.
Step 3 — Apply Gentle Water to One External Zone
With the trailer stationary and the electrical equipment protected, use a gentle, controlled water flow that resembles rainfall.
Begin with one limited external area rather than spraying the entire enclosure at once.
For example, test one section of the lid perimeter while keeping the lock and other suspected openings as dry as practical.
Stop and inspect when moisture first appears.
Step 4 — Work Through Separate Zones
If the first zone stays dry, continue with the next area.
A useful order for a top-opening tongue box is:
- Lid perimeter and corners
- Latch and lock housing
- Hinge-side joint and fasteners
- Accessible body seams
- Other fasteners and added penetrations
For an underbody box, test the door perimeter and latch area before examining accessible lower and underside penetrations. Spray exposure should be reproduced only from safe positions, without working beneath an unsupported vehicle or directing water at electrical components.
Dry the box between tests when needed so that water from one zone is not mistaken for another.
Step 5 — Record Where Moisture Appears First
The first wet point is more informative than the largest puddle.
If paper immediately below a lock shaft becomes wet while the surrounding flange area stays dry, investigate the shaft sealing mechanism.
If water appears along one edge of the lid, inspect gasket contact and alignment.
If droplets emerge from a fastener despite a dry lid perimeter, focus on that penetration.
Step 6 — Confirm the Suspected Path
Repeat the relevant localized test after drying the area.
A repeatable entry path is a stronger basis for repair than a single unexplained wet patch.
The test should reproduce the actual service exposure as closely as practical. Avoid using high-pressure jets as a general-purpose diagnostic method.
Once the entry point is established, select the correction that addresses that specific path.
What the Leak Pattern Tells You
The following table connects observable evidence with likely causes and the next appropriate action.
| Inspection result | What it suggests | Next action |
|---|---|---|
| Moisture first appears at a damaged gasket joint | Local seal discontinuity | Replace or restore the compatible gasket |
| One long edge has poor gasket contact | Lid misalignment, latch compression or deformation | Check closing geometry before replacing parts |
| Water appears around the lock flange | Flange gasket or mounting surface issue | Inspect the lock mounting seal and panel contact |
| Water emerges from the lock shaft | Internal latch sealing failure | Inspect or replace the compatible lock assembly |
| Water appears around hinge fasteners | Fastener penetration or joint leakage | Restore the approved fastener sealing arrangement |
| Moisture crosses the hinge-side lid gap | Gasket compression or hinge alignment issue | Correct the hinge/lid geometry and affected seal |
| Water starts at a body seam | Joint sealing failure or seam damage | Assess the seam and repair according to its construction |
| Water appears at mounting bolts or added holes | Penetration or mounting-seal issue | Correct the approved mounting and sealing interface |
| A corner gap developed after installation | Box twisting or localized deformation | Correct the mounting support and inspect the enclosure |
| No entry path appears, but moisture repeatedly condenses on interior surfaces | Trapped moisture, wet contents or condensation | Investigate internal moisture sources and drying conditions |
Several conditions can occur together.
For example, a twisted toolbox may compress the gasket unevenly and place additional stress on a latch. Replacing the latch gasket alone might reduce leakage without restoring the original lid alignment.
The most reliable repair addresses the cause of the opening, not merely the location where water becomes visible.
Choose seal repair, hardware replacement or structural work
Water intrusion does not automatically mean that the entire toolbox has failed.
The correct response depends on the condition of the sealing components and the underlying structure.
A Local Seal Repair May Be Enough When:
- The gasket is damaged but the lid and body remain correctly aligned.
- The lock's replaceable mounting gasket is worn or displaced.
- A fastener penetration has lost its intended seal but the joint remains mechanically sound.
- A nonstructural seam seal has deteriorated without joint separation or deformation.
- Cleaning removes debris that had prevented proper gasket contact.
Use sealing materials compatible with the existing gasket, panel finish and service environment.
Do not obstruct any designed vent, drainage path or compartment opening, especially in a compartment used for gas cylinders or electrical equipment.
Adding general-purpose sealant without identifying the entry path can conceal the defect, interfere with moving hardware or complicate later maintenance.
Hardware Replacement Is More Appropriate When:
- A lock leaks through an internal shaft seal that is not separately serviceable.
- A hinge is bent, excessively loose or unable to maintain lid alignment.
- Corrosion or physical damage has affected a latch mechanism.
- A replaceable gasket has permanently lost its sealing profile.
- Repeated operation cannot maintain the required closing contact.
Replacing the correct hardware can preserve an otherwise serviceable toolbox.
Structural Inspection or Replacement Is Needed When:
- The lid or door has permanent deformation that prevents continuous sealing.
- The box opening has become twisted or distorted.
- A welded seam is cracked or separated.
- Mounting points have torn, enlarged or lost structural integrity.
- Corrosion or impact has damaged the supporting body panels.
- Correct sealing and alignment cannot be restored through approved repair.
A structurally damaged toolbox should not be returned to service simply because additional sealant temporarily reduces water entry.
Why Drilling Drain Holes Is Not the First Solution
A drain opening may allow water to escape, but it does not eliminate the entry path.
It may also admit dust, road spray or contaminants and compromise the intended enclosure protection.
Where drainage is part of the enclosure design, it should follow the specified water-management arrangement.
An improvised hole in the floor should not replace diagnosis of a leaking lid, lock or seam.
What Changes Between Trailer Tongue and Underbody Toolboxes?
The enclosure's mounting position changes how water reaches it.
This affects both inspection priorities and the type of sealing performance required.
Trailer Tongue Toolbox: Focus on the Lid, Latch and Mounting Geometry
A tongue-mounted box normally has an upper lid that is directly exposed to rainfall.
The rear hinge region, upper perimeter and front latch are natural inspection points.
Installation also matters because a tapered tongue box may be supported by mounting points located on converging frame members.
If those supports do not maintain the intended box geometry, lid sealing can be affected.
When the box sits close to other trailer components, check that the lid can open and close freely without interference.
Underbody Toolbox: Focus on the Door, Spray and Lower Penetrations
An underbody box may have a front-opening or drop-down door rather than a top lid.
The door faces weather from different directions and may receive spray thrown by the vehicle during travel.
In addition to the door gasket, inspect the recessed latch, hinge line, lower fasteners and mounting penetrations.
The location of the wheels, mudguards, brackets and under-tray structure can influence exposure.
A seal that performs acceptably on a protected storage chest may not provide the same result in a continuously exposed underbody position.
Why One Sealing Arrangement Does Not Fit Every Toolbox
A top-opening lid and a downward-opening door do not create the same closing forces, water paths or hinge conditions.
The appropriate gasket profile, latch compression and drainage geometry therefore depend on the enclosure construction.
Diagnosis should begin with the actual toolbox design rather than assuming that every aluminum trailer box shares the same sealing system.
GOODIN: product geometry and procurement requirements
For trailer OEMs, distributors and fleet operators, toolbox leakage is more than an inconvenience.
Repeated water intrusion can damage stored equipment, increase maintenance complaints and lead to unnecessary replacement of otherwise usable boxes.
A better approach is to evaluate the box as a complete enclosure: body geometry, opening design, gasket, latch, hinges, fasteners and mounting structure.
GOODIN's aluminum toolbox range includes different configurations suited to trailer-tongue and underbody storage.
GOODIN GDA006 — Aluminum Trailer Tongue Tool Box
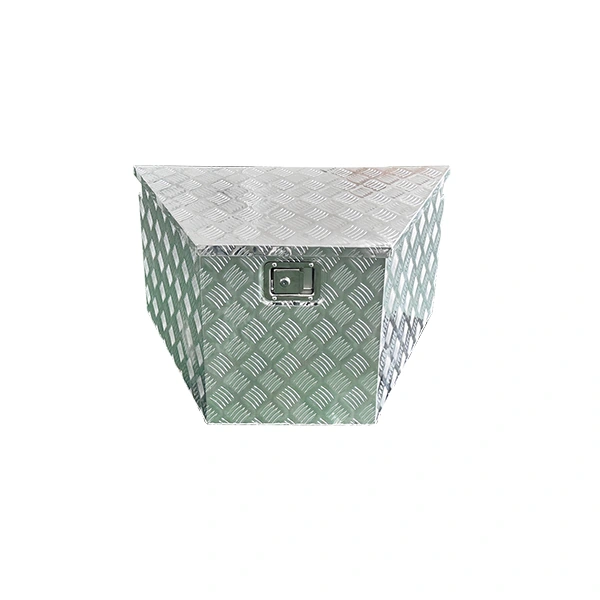
The GDA006 Aluminum Trailer Tongue Tool Box has a tapered checker-plate body, a top-opening lid supported by a gas strut, and a recessed lockable paddle latch.
Its published overall dimensions are 830 × 490 × 460 mm. [4]
For this type of enclosure, post-installation inspection should focus on lid alignment, closure contact, latch sealing, upper hinge details and whether the mounting arrangement preserves the box's intended shape.
GOODIN GDA007 — Aluminum Underbody Truck Tool Box
The GDA007 Aluminum Underbody Truck Tool Box uses a different construction.
It has a 750 × 400 × 250 mm aluminum body with a front drop-down door, side chain supports, a recessed locking latch and a visible perimeter seal. The product range includes left- and right-hand body configurations. [5]
Its installation environment makes door sealing, road-spray exposure, mounting support and accessible lower penetrations especially important.
No verified waterproof or ingress-protection rating has been established for either example from the material available for this guide. Visible hardware and overall dimensions are not evidence of washdown capability.
These two products illustrate why enclosure inspection must follow the actual hardware arrangement. A top-opening lid and a drop-down underbody door should not be treated as identical sealing applications.
What OEM and Distributor Buyers Should Specify
For an outdoor toolbox program, the purchase specification should establish more than dimensions and aluminum thickness.
Relevant requirements include:
- Expected water exposure: rainfall, road spray or washdown
- Lid or door opening orientation
- Gasket material, position and service replacement method
- Latch type and required closing compression
- Lock-shaft and fastener sealing arrangements
- Mounting support and permitted installation interfaces
- Intended inspection and water-resistance verification
- Replacement availability for seals, locks and other service components
If a particular ingress-protection performance level is required, that requirement should be tied to an appropriate test method and the finished enclosure configuration.
A visible rubber seal alone is not a defined water-resistance rating.
For recurring leakage complaints, GOODIN recommends recording the toolbox model, mounting position, exposure conditions, first observed entry point and any previous repair.
That information can help distinguish a damaged seal, unsuitable lock arrangement, installation-related distortion or a broader enclosure design issue.
It also gives distributors and OEM customers a more useful basis for selecting replacement components and improving future installations.
GDA006 — aluminum trailer tongue tool box · GDA007 — aluminum underbody truck tool box · Explore the GOODIN aluminum tool box range.
For model drawings, approved sealing parts and installation requirements, contact GOODIN with the model and recorded entry point.
FAQ and the repair decision
Why does my toolbox still leak when the lid gasket looks fine?
The gasket may not be making continuous contact with the lid, or water may be entering through another opening.
Inspect the lock, hinge fasteners, mounting penetrations and body seams. A gasket that looks undamaged cannot confirm that the complete enclosure is watertight.
Can water leak through a new T-handle toolbox lock?
Yes.
A new T-handle may seal against the toolbox panel but still allow water to pass through its moving shaft mechanism.
If water emerges from the shaft rather than around the outer mounting flange, investigate the internal latch seal or replace the compatible lock assembly.
How do I find a toolbox leak without removing the box?
Start with the box empty and dry. Inspect the gasket and visible hardware, then apply gentle water to individual external zones while observing the first signs of moisture inside.
This helps identify whether water is entering through the lid, latch, fasteners or another accessible joint.
Mounting-related deformation can also be assessed visually before deciding whether removal or further service is necessary.
Can overtightening toolbox mounting bolts cause leaks?
It can contribute to leakage if the mounting arrangement distorts the toolbox body.
Uneven support or excessive localized clamping force may change the lid or door alignment and reduce gasket contact.
Inspect both the mounting support and the resulting enclosure geometry rather than simply tightening the bolts further.
Why does my toolbox stay dry in rain but leak after driving?
Road spray may reach door edges, lower fasteners and mounting penetrations that receive little direct water during stationary rainfall.
The direction and intensity of exposure differ, especially for underbody toolboxes.
Investigate the surfaces exposed during travel before assuming the top lid is responsible.
Should I seal every joint with silicone to stop the leak?
Not before identifying the entry point.
Sealant may be appropriate for certain approved nonstructural joints, but it cannot correct a distorted lid, damaged lock shaft or broken hinge.
Excess sealant can also obstruct intended drainage or interfere with serviceable hardware.
Does water inside always mean an external leak?
No.
Wet tools, retained water after opening the lid, temperature changes and condensation can also produce moisture inside a toolbox.
If controlled external water checks reveal no entry path and moisture appears mainly as uniform droplets on cool interior surfaces, investigate trapped moisture and condensation as well.
Conclusion: Repair the Entry Point, Not Just the Puddle
A weather-resistant trailer toolbox depends on more than an aluminum shell and a rubber gasket.
Water may enter around a lid, pass through a lock shaft, follow hinge fasteners, cross a body seam or exploit a gap created by installation-related deformation.
These faults can leave similar puddles at the bottom of the box, but they require different repairs.
The most effective approach is to dry the enclosure, reproduce the relevant water exposure, identify the first entry point and inspect the condition responsible for that opening.
A damaged gasket may need replacement. A leaking lock may require a new latch assembly. A distorted lid or body may require structural correction or complete enclosure replacement.
The right repair is the one that restores the intended sealing path—not the one that simply covers the visible water stain.
Sources & Further Reading
The forum is an owner observation, not a controlled test; its author later corrected “hinges” to “latches.” Manufacturer examples do not establish an ingress rating for GOODIN products. Source 5 confirms GDA007 catalogue dimensions; supplied product photos confirm visible hardware.
- Caravaners Forum — Toolbox leakage discussion — owner corrects hinges to latches
- Buyers Products — Aluminum underbody box — replaceable gasket and compression latch
- WEATHER GUARD — 131-0-04 aluminum saddle box — weather seal and closure
- GOODIN — GDA006 aluminum trailer tongue tool box
- GOODIN — Tool box catalogue — GDA007 dimensions
- Southco — N4 compression latches — actuator and panel sealing details
Trailer Tool Box Lid Won’t Close Properly: Mounting Distortion, Hinges or Gas Struts?
Hand Winch Ratchet Slips Under Load: How to Identify Pawl, Gear and Locking Failures
Related Article